编辑器扩展 相关 编辑器相关文件夹 Editor
该文件夹可以放在项目的任何文件夹下,可以有多个”Editor”文件夹。
编辑器扩展相关的脚本都要放在该文件夹内,该文件夹中的脚本只会对Unity编辑器起作用。
项目打包的时候,不会被打包到项目中。如果编辑器相关脚本不放在该文件夹中,打包项目可能会出错。
如果非要有些编辑器相关脚本不放在该文件夹中,需要在该类的前后加上UNITY_EDITOR的宏定义
Editor Default Resources
该文件夹需要放在Assets根目录下,用来存储编辑器所需要的图片等资源,书写的时候需要注意中间有空格隔开。
此文件夹也不会被打包,访问方法为:EditorGUIUtility.Load()
当然,也可以在Editor文件夹内创建一个Resources文件夹,将相关资源放在该文件夹内,通过Resources.Load()获取资源,也是可以的
Gizmos
该文件夹也需要放在Assets根目录下,可以用来存放Gizmos.DrawIcon()的图片资源
Selection Selection:用于获取选择的游戏物体
Selection.activeGameObject 返回第一个选择的场景中的对象
Selection.gameObjects 返回场景中选择的多个对象,包含预制体等
Selection.objects 返回选择的多个对象
1 2 3 4 5 foreach (object obj in Selection.objects)
编辑器特性 常见特性 简单类特性
1 2 3 4 5 6 7 8 9 10 11 12 13 [Serializable ] RequireComponent(typeof(xxx)) ] DisallowMultipleComponent ] ExecuteInEditMode ] CanEditMultipleObjects ] AddComponentMenu ] SelectionBase ]
复杂类特性
1 2 3 [CustomEditor(typeof(xxx) ] CustomPropertyDrawer ]
方法特性
1 2 3 [MenuItem() ]DrawGizmo ]
属性特性
1 2 3 4 5 6 7 8 9 10 11 12 13 14 15 16 17 18 19 20 21 [SerializeField ] NonSerialized ] HideInInspector ] Range(0,100) ] Multiline(3) ] TextArea(2,4) ] ColorUsage(true) ] FormerlySerializedAs(“Value1”) ] Header(“Header Name”) ] Tooltip(“Tips”) ] Space(10) ]
其他特性
1 2 3 4 ContextMenuItem ]ContextMenu ]
自定义菜单栏 MenuItem用于在编辑器中添加自定义的菜单栏目,或者添加到既有栏目中
用法一:需要注意的就是 unity 的顶部菜单的父一级,是不支持中文的,就是Menu那一级,它的子级就没关系了。
1 2 3 4 5 [MenuItem("Menu/普通的顶部菜单" ) ]private static void MenuItemNormal ()"普通的顶部菜单" );
用法二:
第二个参数用来选择当前方法是否用作有效判断,如果为true,则需要跟一个返回值为bool的方法,该方法返回了true,才会执行下一个方法
第三个参数priority是优先级,用来表示菜单按钮的先后顺序,默认值为1000。一般菜单中的分栏,数值相差大于10。
1 2 3 4 5 6 7 8 9 10 11 12 13 14 15 16 17 18 19 20 21 [MenuItem("MyTool/DeleteAllObj" , true) ]private static bool DeleteValidate ()if (Selection.objects.Length > 0 )return true ;else return false ;MenuItem("MyTool/DeleteAllObj" ,false) ]private static void MyToolDelete ()foreach (Object item in Selection.objects)
快捷键
符号
字符
%
Ctr/Command
#
Shift
&
Alt
LEFT/Right/UP/DOWN
方向键
F1-F2
F功能键
_g
字母g
1 2 [MenuItem(“MyTools/test1 %_q”) ]
右键扩展 在不同面板中添加右键操作
1 2 3 4 5 6 7 8 9 10 11 12 13 14 15 16 17 18 19 20 21 22 23 24 25 26 27 28 MenuItem("Assets/测试1" ) ]private static void Test1 ()MenuItem("GameObject/测试2" ) ]private static void Test2 ()MenuItem("CONTEXT/Rigidbody/测试3" ) ]private static void Test3 ()MenuItem("CONTEXT/PlayerHealth/Init" ) ]private static void Init (MenuCommand cmd )as PlayerHealth;
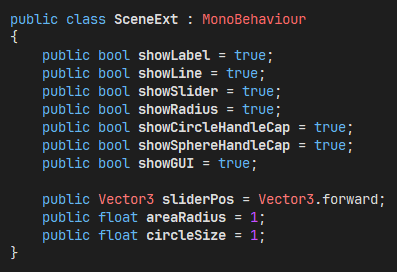
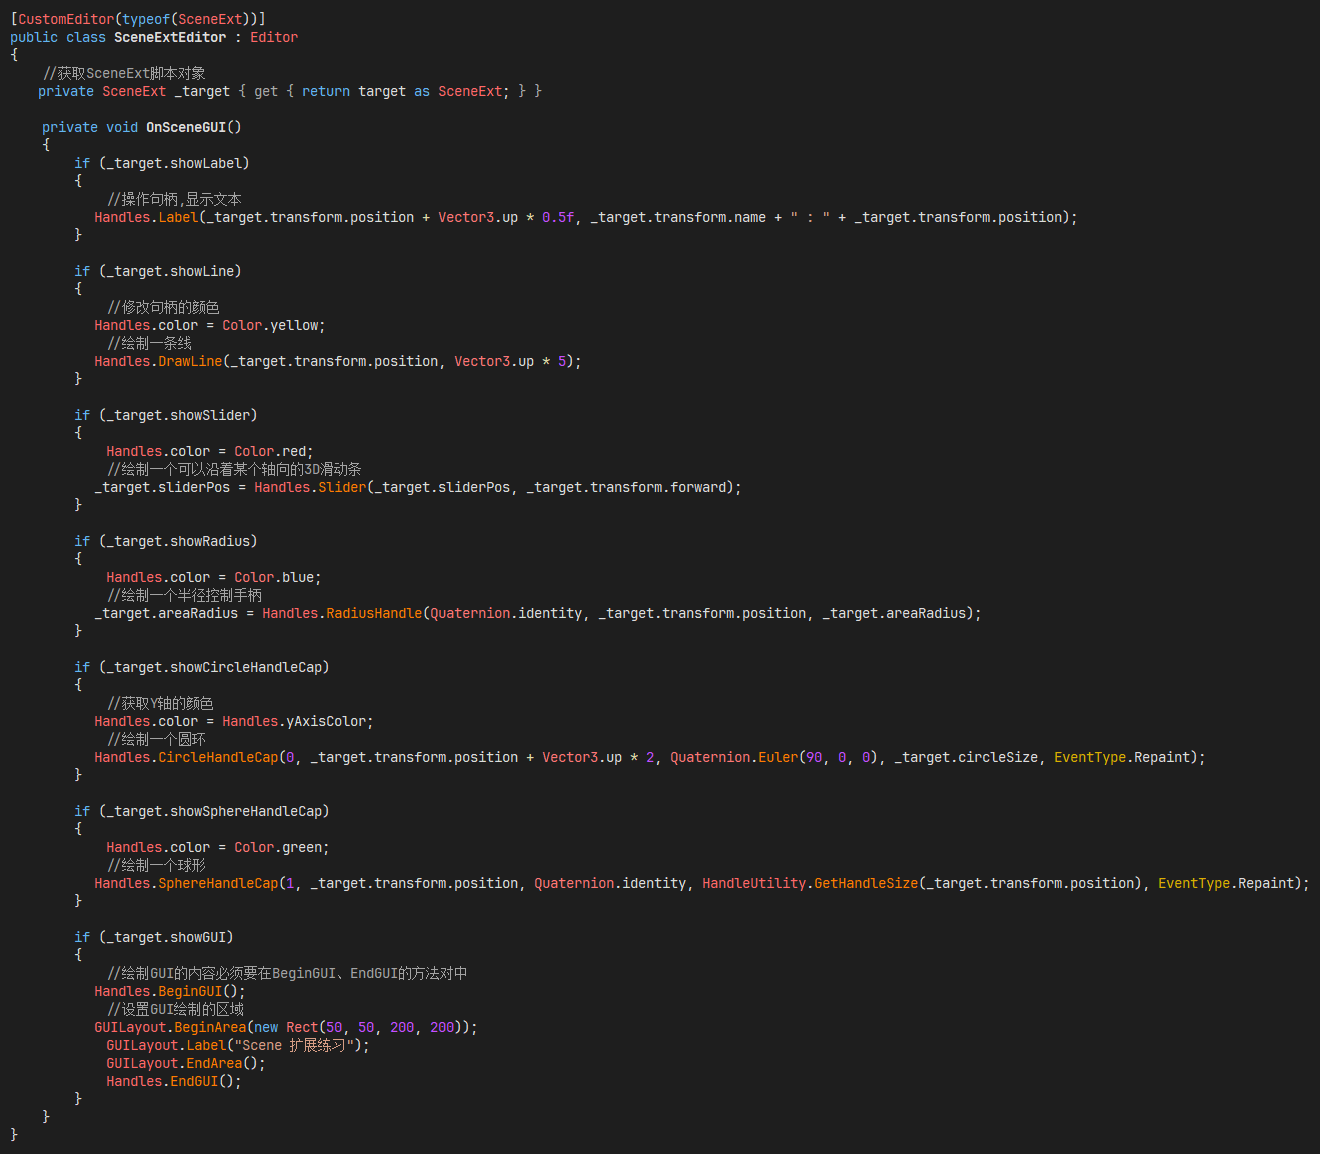
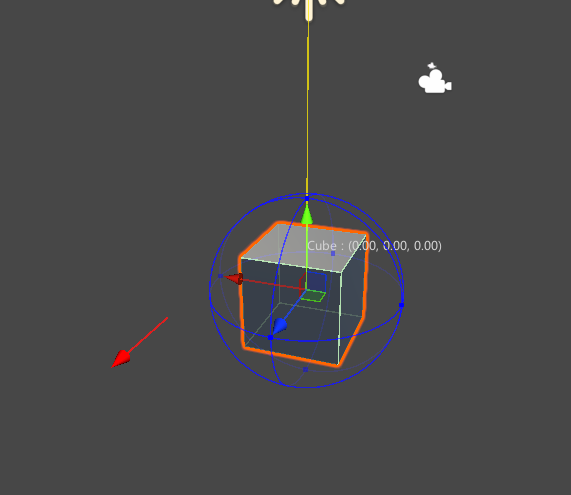
扩展Scene视图 场景视图是编辑游戏对象的窗口,扩展场景视图可以实现网格编辑,地形绘制或高级Gizmos等操作。视图的扩展主要通过OnSceneGUI()方法实现,因为场景扩展是基于场景对象的,所以可以选择不同的对象实现不同的场景视图操作。
CustomEditor 先创建一个脚本,挂载在场景对象身上。
再编写编辑器脚本,方式和创建Inspector扩展方式差不多,也需要放在Editor文件夹内
OnSceneGUI方法是通过Handles来绘制内容的
Handls Unity Editor 基础篇(四):Handles (qq.com)
Gizmo 方法特性——DrawGizmo 在Scene下为带有”XX”的组件绘制gizmo
绘制模式
1 2 3 4 [DrawGizmo(GizmoType.SelectedOrChild) ] DrawGizmo(GizmoType.Active) ] DrawGizmo(GizmoType.Selected) ] DrawGizmo(GizmoType.Selected | GizmoType.Active) ]
举例
1
2
3
4
5
6
7
8
9
10
11
12
13
using UnityEngine;using System.Collections;using UnityEditor;public class GimoTest DrawGizmo(GizmoType.SelectedOrChild) ] private static void MyGizmo (Light light, GizmoType gizmoType )
OnDrawGizmos 除了特性之外,MonoBehaviour中可以实现OnDrawGizmos()和OnDrawGizmosSelected()方法
常用Gizmos的方法
Gizmos.DrawCube() 绘制实体立方体
Gizmos.DrawWireCube() 绘制立方体边框
Gizmos.DrawRay() 绘制射线
Gizmos.DrawLine() 绘制直线
Gizmos.DrawIcon() 绘制Icon,Icon素材需要放在Gizmos文件夹中
Gizmos.DrawFrustum() 绘制摄像机视椎体的视野范围
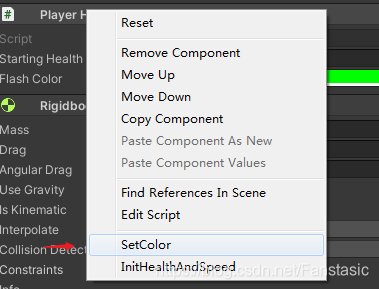
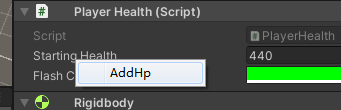
自定义Inspector面板 ContextMenu和ContextMenuItem都是给脚本组件用的,前者是给这个脚本组件中的方法提供一个右键调用,后者是给这个脚本组件中的属性提供一个右键调用,都是在Inspector面板中进行
从使用来看,ContextMenu是方法特性,ContextMenuItem是属性特性
1
2
3
4
5
6
7
8
9
10
11
12
13
14
15
16
17
18
19
20
using System.Collections;using System.Collections.Generic;using UnityEngine;public class PlayerHealth : MonoBehaviour ContextMenuItem("AddHp" ,"AddHp" ) ]public int startingHealth;public Color flashColor;void AddHp ()30 ;ContextMenu("SetColor" ) ]void SetColor ()
CustomEditor CustomEditor是类特性,为一个组件或者脚本上的字段自定义绘制方法,定义的类要继承editor类
CustomEditor只能直接修改一个类的绘制,但对嵌套不起作用,例如它修改了NPCDetails类的绘制,但是在另一个类面板中的List<NPCDetails>字段的绘制不受影响,这时候需要使用CustomPropertyDrawer
1 2 3 4 5 6 7 8 public class EditorAttribute : MonoBehaviour public int damage;public int armor;public GameObject gun;
1 2 3 4 5 6 7 8 9 10 11 12 13 14 15 16 17 18 19 20 21 22 23 24 25 26 27 28 29 30 31 32 33 34 35 36 37 38 39 40 41 42 43 44 45 46 47 48 49 50 51 52 53 54 [CustomEditor(typeof(EditorAttribute)) ] public class EditorAttributes : Editor void OnEnable ()"damage" );"armor" );"gun" );as Card;var cards = targets;public override void OnInspectorGUI ()0 , 100 , new GUIContent("Damage" ));if (!damageProp.hasMultipleDifferentValues)100.0f , "Damage" );0 , 100 , new GUIContent("Armor" ));if (!armorProp.hasMultipleDifferentValues)100.0f , "Armor" );new GUIContent("Gun Object" ));void ProgressBar (float value , string label18 , 18 , "TextField" );value , label);
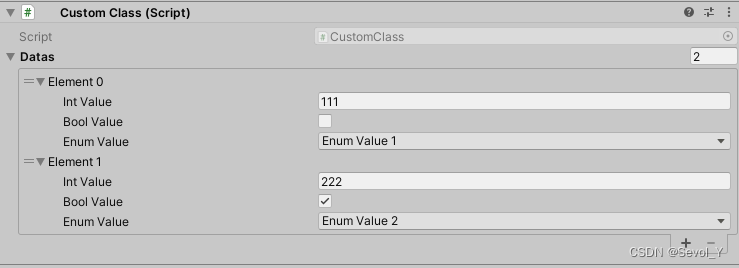
CustomPropertyDrawer PropertyDrawer用于自定义属性绘制器的基类。使用PropertyDrawer来控制它在Inspector中的样式。可以使用CustomPropertyDrawer 特性将 PropertyDrawer附加到 Serializable类,然后传入绘制器进行渲染。使用此基类有两种用途:绑定到类或者绑定到特性
绑定到使用了[Serializable]的自定义类,可以自定义绘制类在Inspector上显示的GUI 。
之前
之后
代码:
绑定到一个类xxx,[CustomPropertyDrawer(typeof(xxx))],这个类不能继承自MonoBehaviour,否则会报错
继承自PropertyDrawer
只需重载OnGUI
1 2 3 4 5 6 7 8 9 10 11 12 13 14 15 16 17 18 19 20 21 22 23 24 25 26 27 28 29 30 [Serializable ]public class MonoTest public enum EnumValuepublic int intValue;public bool boolValue;public EnumValue enumValue;CustomPropertyDrawer(typeof(MonoTest)) ]public class MonoTestEditor : PropertyDrawer public override void OnGUI (Rect position, SerializedProperty property, GUIContent label )var nameRect = new Rect(position.x, position.y, 222 , position.height);var amountRect = new Rect(position.x + 222 , position.y, 222 , position.height);var unitRect = new Rect(position.x + 222 + 222 , position.y, 222 , position.height);100 ;"intValue" ));"boolValue" ));"enumValue" ));
绘制使用了某种特性的字段的显示方式
代码:
绑定到某个自定义特性
继承自PropertyDrawer
重载OnGUI
1 2 3 4 5 6 7 8 9 10 11 12 13 14 15 16 17 18 19 20 21 22 23 24 25 26 27 28 29 30 31 32 33 34 35 36 37 38 39 40 public sealed class RangeTestAttribute : PropertyAttribute public readonly float min;public readonly float max;public RangeTestAttribute (float min, float maxthis .min = min;this .max = max;CustomPropertyDrawer(typeof(RangeTestAttribute)) ]public class RangeTestAttributeDrawer : PropertyDrawer public override void OnGUI (Rect position, SerializedProperty property, GUIContent label )if (property.propertyType == SerializedPropertyType.Float)new Rect(position.x, position.y, position.width * 0.8f , position.height), property, range.min, range.max);new Rect(position.x + position.width * 0.8f , position.y, position.width - (position.x + position.width * 0.8f ), "滑到了" + property.floatValue);else new Rect(position.x, position.y, position.width, position.height), "只支持float类型属性" , MessageType.Error);public override float GetPropertyHeight (SerializedProperty property, GUIContent label )return base .GetPropertyHeight(property, label);
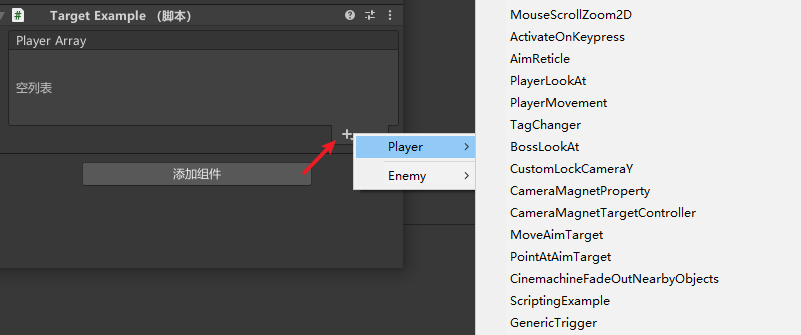
List添加下拉框
直接上代码
1
2
3
4
5
6
7
8
9
10
11
12
13
14
15
16
17
18
public class TargetExample : MonoBehaviour SerializeField ]public List<PlayerItem> playerItemArray = new List<PlayerItem>(); System.Serializable ]public class PlayerItem SerializeField ]public Texture icon;SerializeField ]public GameObject prefab;SerializeField ]public string name;SerializeField ]public int attack;
1
2
3
4
5
6
7
8
9
10
11
12
13
14
15
16
17
18
19
20
21
22
23
24
25
26
27
28
29
30
31
32
33
34
35
36
37
38
39
40
41
42
43
44
45
46
47
48
49
50
51
52
53
54
55
56
57
58
59
60
61
62
63
64
65
66
67
68
69
70
71
72
73
74
75
76
77
78
79
80
81
82
83
84
85
86
87
88
89
90
91
92
93
94
95
96
97
98
99
100
101
102
103
104
105
106
107
108
109
110
111
112
113
114
115
116
117
118
119
120
121
122
123
124
125
126
127
128
129
130
131
132
133
134
135
using UnityEngine;using UnityEditor;using UnityEditorInternal;public enum PrefabTypepublic struct Creationpublic PrefabType prefabType;public string path; CustomEditor(typeof(TargetExample)) ]public class TargetExampleEditor : Editor private ReorderableList _playerItemArray;private void OnEnable ()new ReorderableList(serializedObject, serializedObject.FindProperty("playerItemArray" )true , true , true , true );"Player Array" );68 ;int index,bool selected,bool focused) =>4 ;2 ;new GUIContent("Index " +index));if (EditorUtility.DisplayDialog("Warnning" ,"Do you want to remove this element?" ,"Remove" ,"Cancel" ))new GenericMenu();var guids = AssetDatabase.FindAssets("t:Prefab" , new string [] { "Assets/Prefabs/Player" });foreach (var guid in guids)var path = AssetDatabase.GUIDToAssetPath(guid);new GUIContent("Player/" + System.IO.Path.GetFileNameWithoutExtension(path))false , ClickHandler, new Creation() { prefabType = PrefabType.Player, path = path });"" );"t:Prefab" , new string [] { "Assets/Prefabs/Enemy" });foreach (var guid in guids)var path = AssetDatabase.GUIDToAssetPath(guid);new GUIContent("Enemy/" + System.IO.Path.GetFileNameWithoutExtension(path))false , ClickHandler, new Creation() { prefabType = PrefabType.Enemy, path = path });public override void OnInspectorGUI ()private void ClickHandler (object targetint index = _playerItemArray.serializedProperty.arraySize;switch (creation.prefabType)case PrefabType.Player:90 );break ;case PrefabType.Enemy:80 );break ;private void SpawnCharacter (Creation creation, SerializedProperty element,int atk )"prefab" );"icon" );"name" );"attack" );private Texture GetPreviewTex (GameObject obj )return AssetPreview.GetAssetPreview(obj) as Texture;
重点其实就是通过委托onAddDropdownCallback和GenericMenu实现下拉列表功能
参考:Unity 编辑器扩展总结 七:数组或list集合的显示方式_editorguilayout展示list-CSDN博客
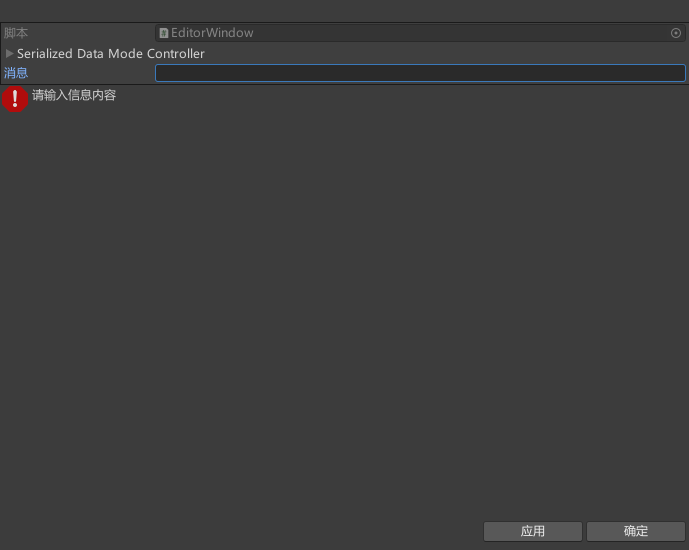
编辑器窗体 ScriptableWizard ScriptableWizard类是一个用于创建自定义向导式编辑器界面的类
详细API见ScriptableWizard - Unity 脚本 API
举例
1
2
3
4
5
6
7
8
9
10
11
12
13
14
15
16
17
18
19
20
21
22
23
24
25
26
27
28
29
30
31
32
33
34
35
36
37
38
39
40
41
42
43
44
45
46
47
48
49
50
51
52
53
54
55
56
57
58
59
60
61
62
63
64
65
66
public class EditorWindow : ScriptableWizard public string msg = "" ;MenuItem("MyWindow/First Window" ) ]private static void ShowWindow ()"WindowExample1" , "确定" , "应用" );private void OnEnable ()"OnEnable" );private void OnDisable ()"OnDisable" );private void OnDestroy ()"OnDestroy" );private void OnWizardUpdate ()"OnWizardUpdate" );if (string .IsNullOrEmpty(msg))"请输入信息内容" ; "" ; else "" ;"请点击确认按钮" ;void OnWizardOtherButton ()"OnWizardOtherButton" );void OnWizardCreate ()"OnWizardCreate" );protected override bool DrawWizardGUI ()return base .DrawWizardGUI();
EditorWindow 创建自定义的编辑器窗体都需要继承自EditorWindow类
1
2
3
4
5
6
7
8
9
10
11
12
13
14
15
16
17
18
19
20
21
22
23
24
25
26
27
28
29
30
31
32
33
34
35
36
37
38
39
40
41
42
43
public class WindowExample2 : EditorWindow private static WindowExample2 window;MenuItem("MyWindow/Second Window" ) ] private static void ShowWindow ()"Window Example" );private void OnEnable ()"OnEnable" );private void OnGUI ()"Your Second Window" , EditorStyles.boldLabel);private void Update ()"Update" );private void OnDisable ()"OnDisable" );private void OnDestroy ()"OnDestroy" );
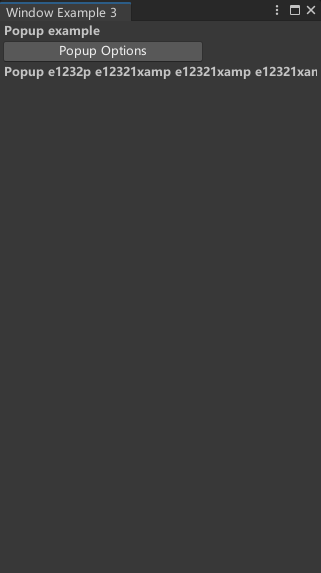
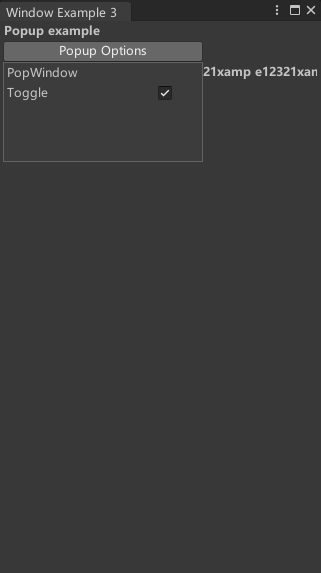
用于实现在编辑器中弹出窗口,弹窗类继承自PopupWindowContent类,
特点
弹窗位置一般会指定在上层窗口的GetLastRect
弹窗会覆盖上层窗口显示
当弹窗失去焦点时,就会自动关闭。
1
2
3
4
5
6
7
8
9
10
11
12
13
14
15
16
17
18
19
20
21
22
23
24
25
26
27
28
29
30
31
32
33
34
35
36
37
38
39
40
41
42
43
44
45
46
47
48
49
50
51
52
53
54
55
56
57
58
59
public class WindowExample3 : EditorWindow private static WindowExample3 window;private PopWindowExample popWindow = new PopWindowExample();private Rect buttonRect;MenuItem("MyWindow/Third Window" ) ]private static void ShowWindow ()"Window Example 3" );private void OnGUI ()"Popup example" , EditorStyles.boldLabel);if (GUILayout.Button("Popup Options" , GUILayout.Width(200 )))if (Event.current.type == EventType.Repaint)"Popup e1232p e12321xamp e12321xamp e12321xam1xample" , EditorStyles.boldLabel);public class PopWindowExample : PopupWindowContent bool toggle = true ;public override void OnOpen ()"OnOpen" );public override void OnGUI (Rect rect )"PopWindow" );"Toggle" , toggle);public override void OnClose ()"OnClose" );public override Vector2 GetWindowSize ()return new Vector2(200 , 100 );
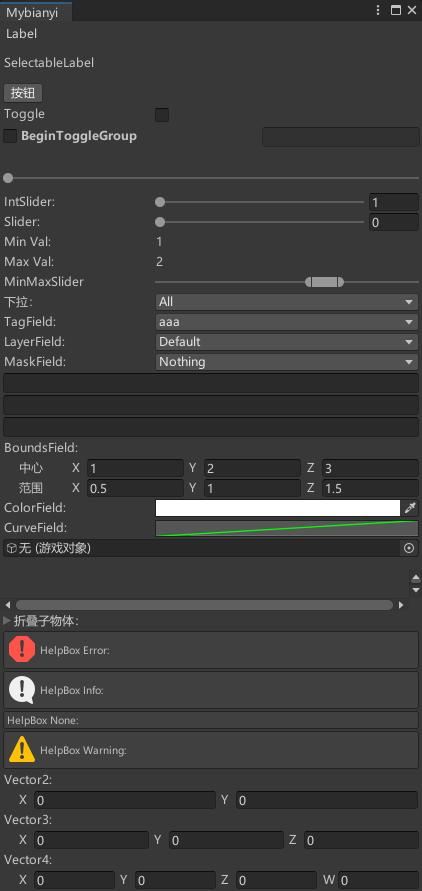
Layout 概述 解释一下Unity中的编辑器扩展类,分为两组:
GUI和GUILayout的比较 1.使用GUI和EditorGUI需要手动设置控件的Rect,位置宽高固定,不能自适应宽高,例如:
1 2 GUI.Button(new Rect(0 , 0 , 100 , 100 ),"btn" );new Rect(0 , 0 , 100 , 100 ),"label" );
2.使用GUILayout和EditorGUILayout生成控件是自动布局,不用设置Rect。例如:
1 2 GUILayout.Button("btn" );"label" );
API 2024-02-12 Unity 编辑器开发之编辑器拓展3 —— EditorGUI_unity编辑器拓展开发-CSDN博客
1
2
3
4
5
6
7
8
9
10
11
12
13
14
15
16
17
18
19
20
21
22
23
24
25
26
27
28
29
30
31
32
33
34
35
36
37
38
39
40
41
42
43
44
45
46
47
48
49
50
51
52
53
54
55
56
57
58
59
60
61
62
63
64
65
66
67
68
69
70
71
72
73
74
75
76
77
78
79
80
81
82
83
84
85
86
87
88
89
90
91
92
93
94
95
96
97
98
99
100
101
102
103
104
105
106
107
108
109
110
111
112
113
114
115
116
117
118
119
120
121
122
123
124
125
126
127
128
129
130
131
132
133
134
135
136
137
138
139
140
141
142
143
144
145
146
using System.Collections;using System.Collections.Generic;using UnityEngine;using UnityEditor;public class Mybianyi : EditorWindow string PasswordField = "" ;string m_textArea = "" ;float sliders = 0 ;int slidera = 0 ;string BeginToggleGroup = "BeginToggleGroup" ;bool ToggleGroup = false ;string Textfield1 = "" ;string Textfield2 = "" ;bool fg = false ;float sum = 0 ;int count = 0 ;string tag = "aaa" ;int Layerfield=0 ;string [] pathname = new string [] { "All" , "Asset" , "..." }; float minVal = 1 ;float maxVal = 2 ;float minLimit = -5 ;float maxLimit = 5 ;static Vector3 center = new Vector3(1 , 2 , 3 );static Vector3 size1 = new Vector3(1 , 2 , 3 );new Bounds(center, size1);0 , 0 , 10 , 10 );new Vector2(200 ,200 );int flags = 0 ;string [] options = new string [] { "CanJump" , "CanShoot" , "CanSwim" ,"Canabc" ,"Canacc" };bool showFoldout;new Vector2();new Vector3();new Vector4();bool fold;bool fold2;MenuItem("MyWindow/Window" ) ]static void window ()private void OnGUI ()"Label" , GUILayout.Width(60 ), GUILayout.Height(20 )); "SelectableLabel" );if ( GUILayout.Button("按钮" , GUILayout.Width(40 ), GUILayout.Height(20 )))"Toggle" , fg, GUILayout.Width(40 ), GUILayout.Height(20 ));20 );0 , 10 );20 );"IntSlider:" , slidera, 1 , 10 );"Slider:" ,sliders,0 ,10 );"Min Val:" , minVal.ToString());"Max Val:" , maxVal.ToString());"MinMaxSlider" , ref minVal, ref maxVal, minLimit, maxLimit); "下拉:" ,count,pathname);"TagField:" , tag);"LayerField:" , Layerfield);"MaskField:" , flags, options);'*' );"BoundsField:" , _bounds);"ColorField:" , m_color);"CurveField:" , m_curve);typeof (GameObject),true );10 );true ,true );40 );"折叠子物体:" );if (showFoldout)"折叠块内容1" );"折叠块内容2" );"折叠块内容3" );"HelpBox Error:" , MessageType.Error);"HelpBox Info:" , MessageType.Info);"HelpBox None:" , MessageType.None);"HelpBox Warning:" , MessageType.Warning);"Vector2:" , m_vector2);"Vector3:" , m_vector3);"Vector4:" , m_vector4);
EditorGUI - Unity 脚本 API (unity3d.com)
EditorGUILayout - Unity 脚本 API —- EditorGUILayout - Unity 脚本 API (unity3d.com)
EditorGUIUtility - Unity 脚本 API —- EditorGUIUtility - Unity 脚本 API (unity3d.com)
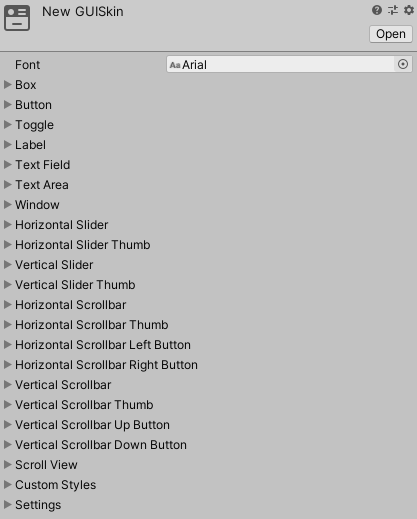
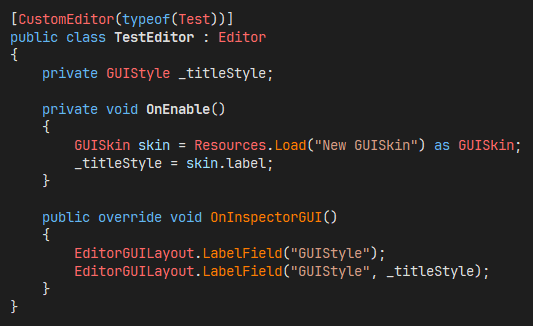
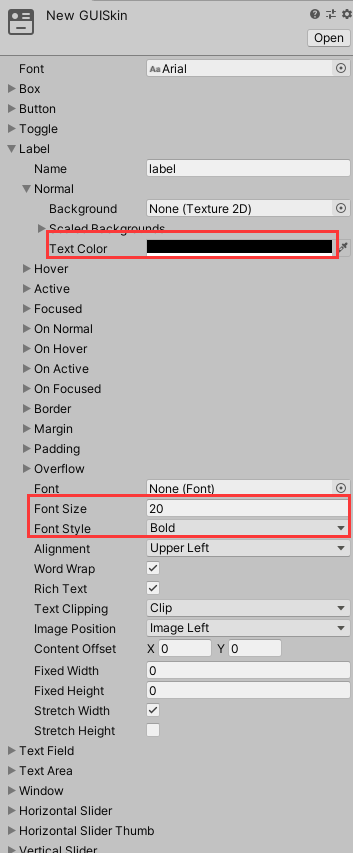
GUIStyle、GUISkin GUIStyle GUIStyle用于修改GUI的风格样式,除了适用于编辑器开发,也适用于Unity旧版的UI系统(IMGUI)。GUIStyleu拥有多种属性,可以方便开发者自定义编辑器UI样式。
当我们未自定义GUIStyle时,使用的就是unity默认的GUIStyle样式。GUIStyle有点像网页前端开发的层叠样式表CSS,拥有很多状态属性可以调整。
GUISkin GUISkin是基本所有样式的集合,可以作为一种配置资源。如果开发者需要自定义大量的GUIStyle,可以通过GUISkin配置资源来定义,并且开发者可以在Inspector面板中直接修改样式。
在Project面板,鼠标右键Create-GUISkin既可以创建。
可以将新建的GUISkin资源放在Editor里的Resources文件内,方便动态加载。
接下来,就可以通过GUISkin资源来修改样式效果了。如下修改会得到和之前通过直接修改GUIStyle一样的效果。
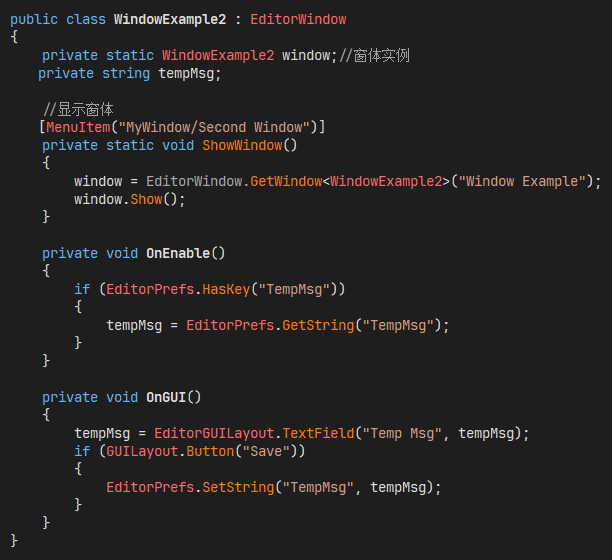
数据保存 EditorPrefs Unity编辑器为开发者提供了类似PlayerPrefs的数据保存方式EditorPrefs。EditorPrefs是适用于编辑器模式,而PlayerPrefs适用于游戏运行时。
EditorPrefs提供了四种数据的保存:int,float,string,bool
通过Set方法保存下数据,下次则通过Get方法来获取数据,HasKey方法可以判断是否存在该数据的保存,删除数据调用DeleteKey方法即可。
注意:需要谨慎调用EditorPrefs.DeleteAll()方法,因为该方法还可能会删除Unity编辑器自身存储的一些数据,给开发者带来不必要的麻烦。
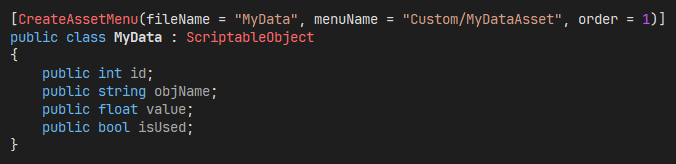
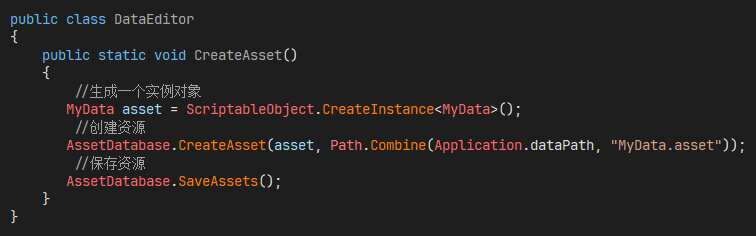
ScriptableObject 只需要继承自ScriptableObject,然后在类中定义需要的数据即可。
在类前可以添加CreateAssetMenu属性,方便开发者在Project面板右键Create创建该资源。
也可以通过方法调用来创建资源,最终得到的资源是一样的,该脚本需要放在Editor文件夹中。
可以将创建的资源放在Resources文件夹中,通过动态的方式加载。
如果遇到ScriptableObject数据不能正常保存的情况,可以尝试使用EditorUtility.SetDirty方法,标记该ScriptableObject为“脏”,然后就能正常保存了。
Undo Undo用于编辑器模式下的撤销操作,这里介绍几种常用的API。
Undo.RegisterCreatedObjectUndo : 记录新建的对象状态,可以撤销新建的对象
Undo.RecordObject:记录对象的状态,需要在修改之前调用
Undo.AddComponent:可以撤销新挂载的组件
Undo.DestroyObjectImmediate:可以撤销删除对象的操作
Undo.SetTransformParent:可以撤销修改父对象的操作
参考 Unity 编辑器扩展总结 一:编辑器开发入门_unity 编辑器扩展总结一:编辑器开发入门-CSDN博客
Unity中GUI、GUILayout、EditorGUI、EditorGUILayout、GUILayoutUtility、EditorGUIUtility区别_editorguilayout和guilayout-CSDN博客
Unity编辑器扩展之自定义Inspector面板_unity自定义inspector class-CSDN博客
Unity编辑器扩展之CustomPropertyDrawer理解-CSDN博客
革命性Unity 编辑器扩展工具 —- Odin Inspector 系列教程_odininspector-CSDN博客