Post Processing
Post Processing
基础
概念
使用后期处理有两个主要原因:实现所需的视觉风格和确保视觉保真度
- 视觉风格是指项目的风格外观和感觉
- 视觉保真度是指场景反映其所要表示的世界的准确程度。
安装和设置
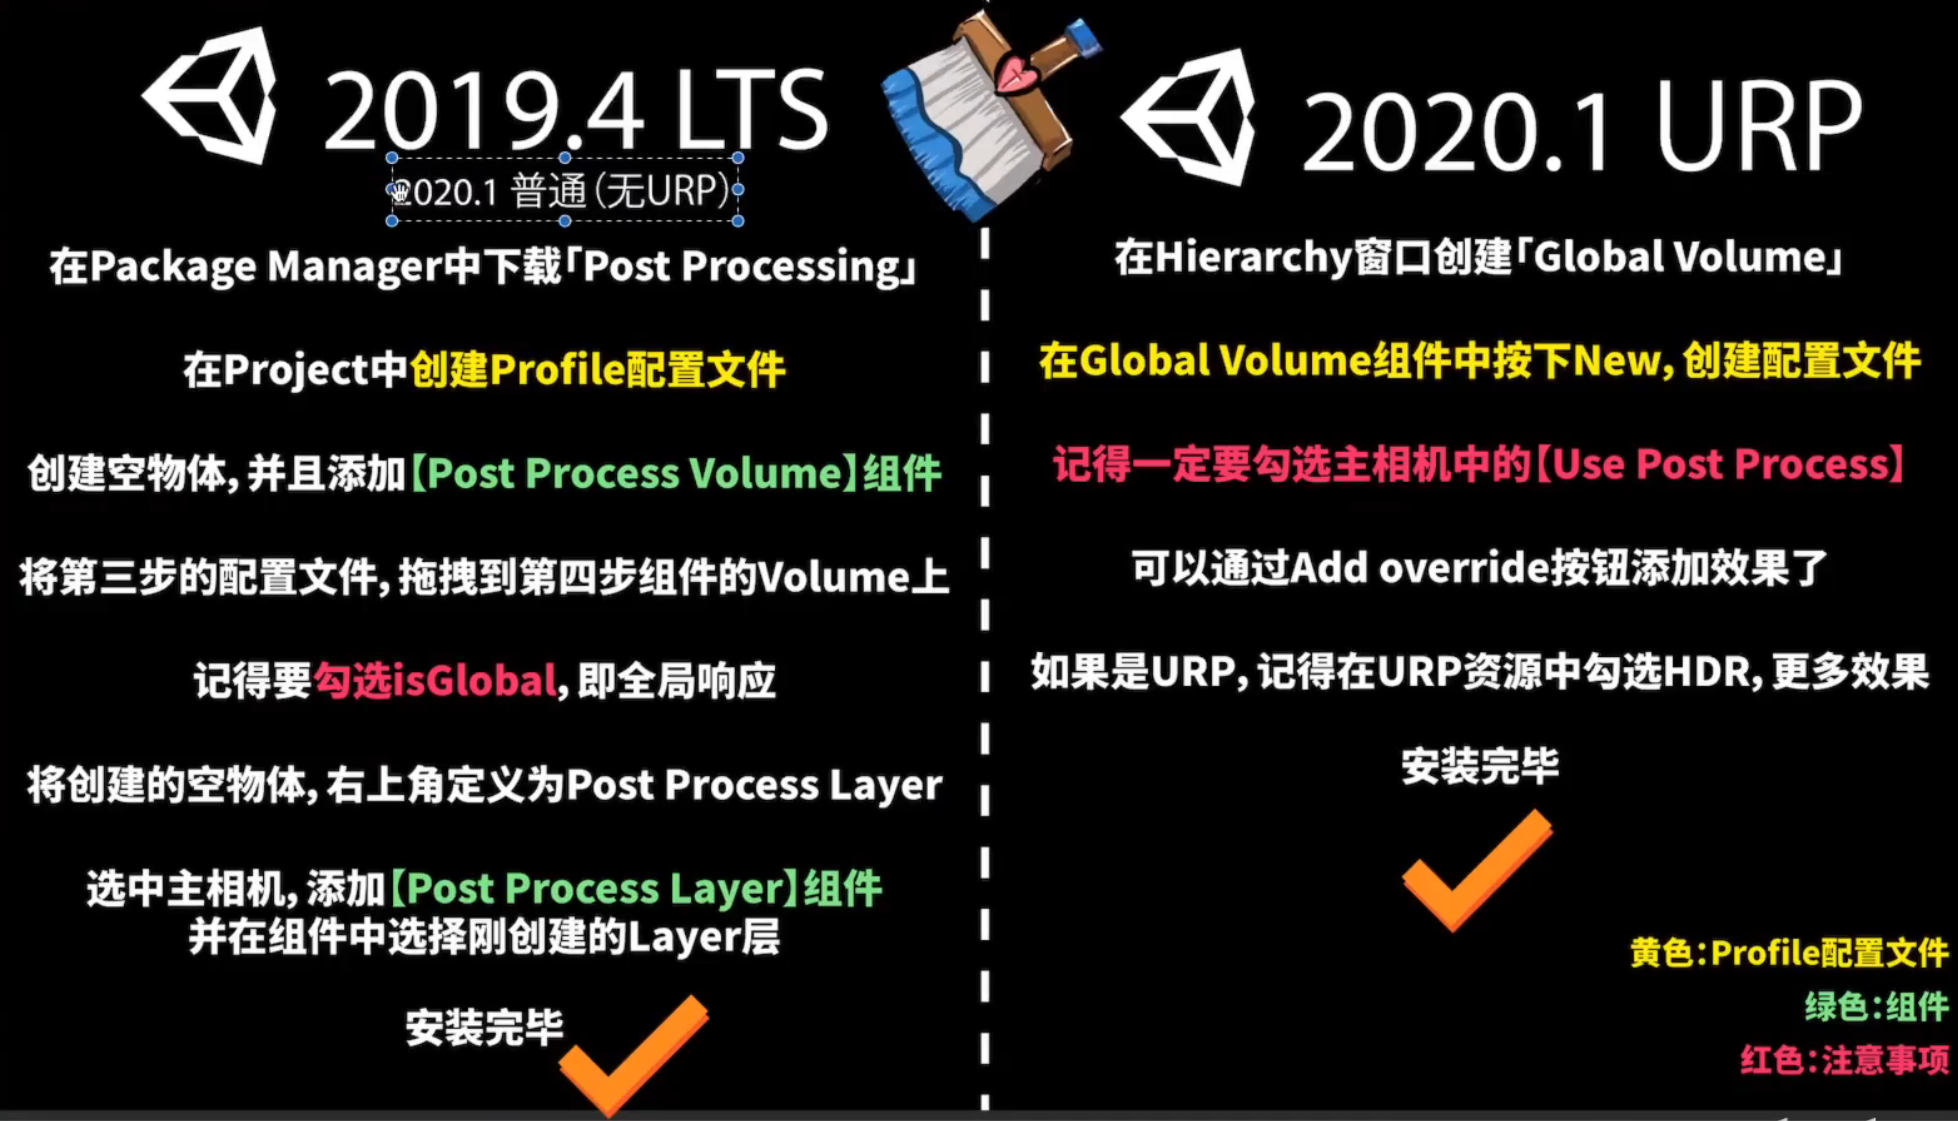
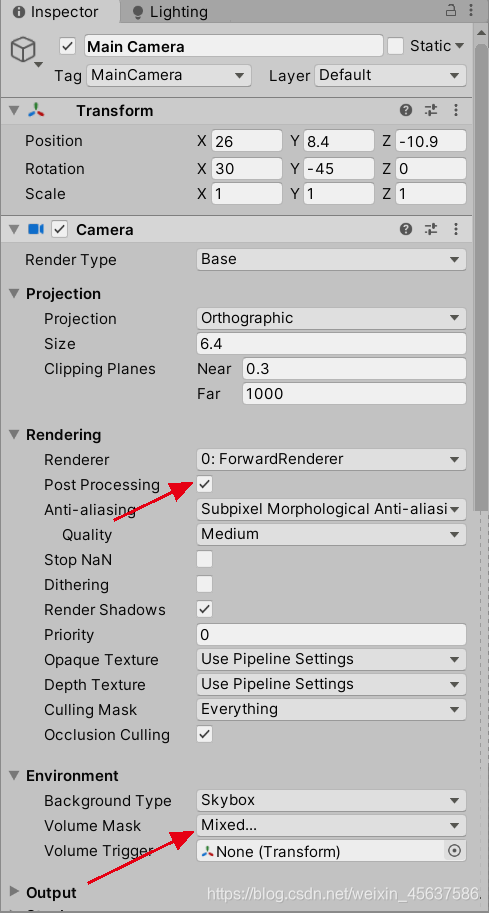
每个摄像机都可以应用后期处理,要应用后处理,需要勾选Post Processing,以及在Enviroment中的volumn mask要选择volumn文件所在的层
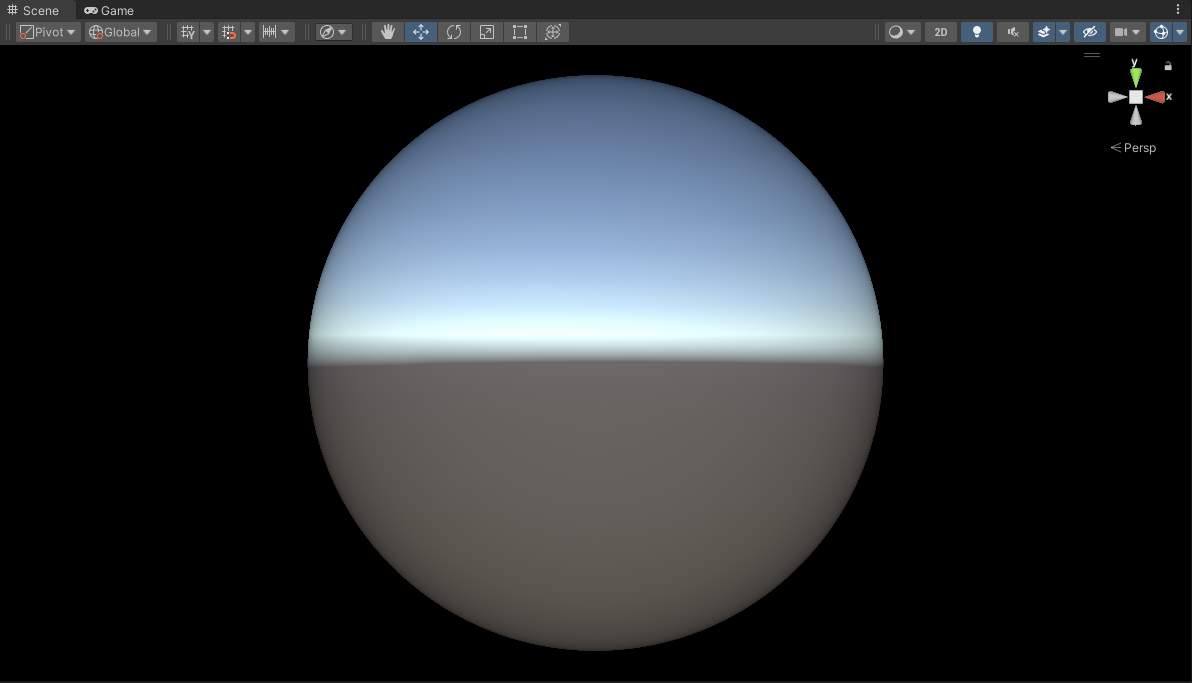
Volume
为了实际应用新效果,我们需要在场景中添加一个叫做 Volume 的东西。体积指定场景中的特定物理区域。当摄像机位于该体积内时,后期处理将影响摄像机渲染的内容。
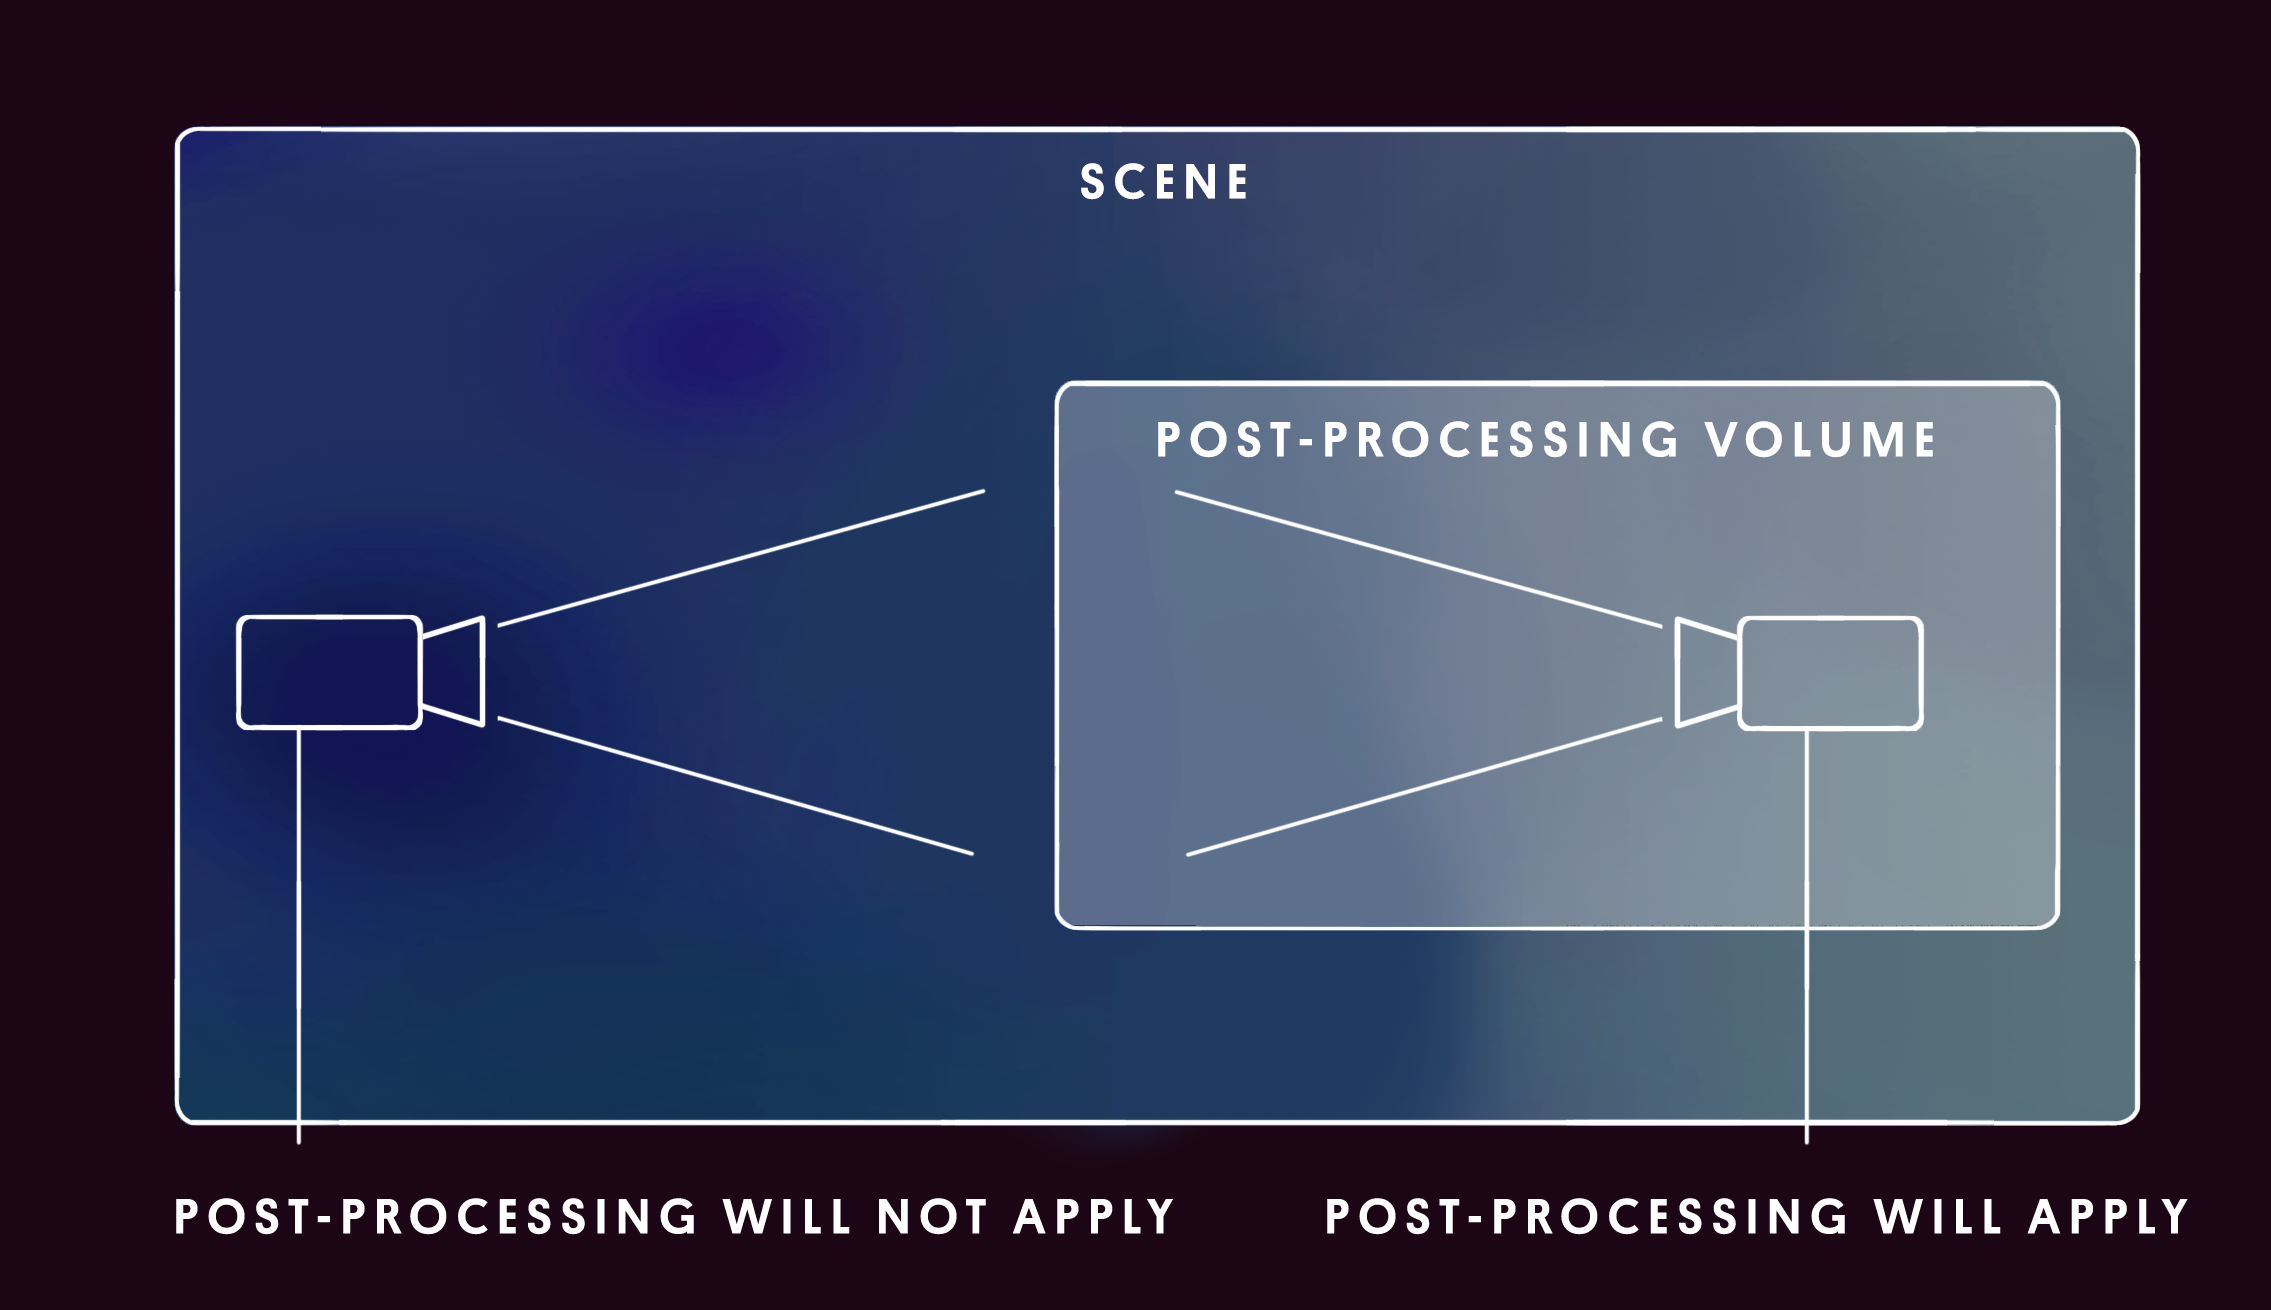
可以使用全局Volume,它将效果应用于整个场景,或者使用较小的局部Volume,仅当摄像机位于特定区域时才应用效果。
效果一览

效果
2020版本及以后,Ambient Occlusion 环境光遮蔽和Screen-space reflections已经不在post processing包中支持,具体可见Unity - 手动:后期处理和全屏效果 —- Unity - Manual: Post-processing and full-screen effects
以下只解释含义,具体参数的含义见:Post-processing in the Universal Render Pipeline | Universal RP | 10.0.0-preview.26 (unity.cn)
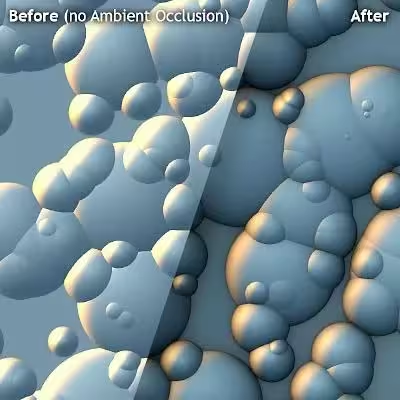
Ambient Occlusion 环境光遮蔽
环境光遮蔽,顾名思义,指的是场景中的环境光会出现被遮蔽的效果,一般的环境光都是不考虑方向和位置的常量,但是环境光遮蔽会考虑环境光被其他物体遮挡的情况
环境光遮挡效果可以使挨着折痕线、小孔、相交线和平行表面的地方变暗。在现实世界中,这些区域往往会阻挡或遮挡周围的光线,因此它们会显得更暗。
小科普 | 是什么蒙蔽了你的双眼?是环境光遮蔽(一) - 哔哩哔哩 (bilibili.com)
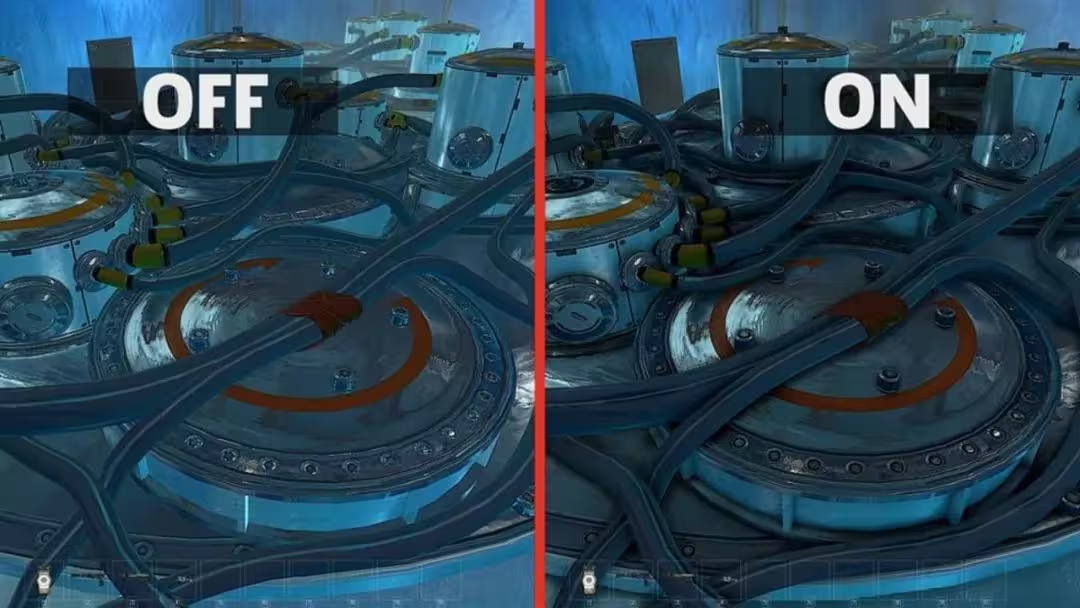
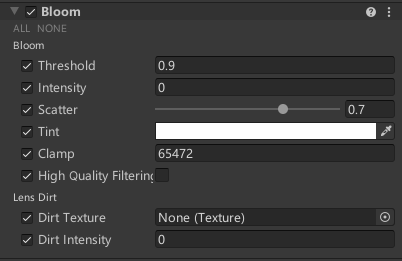
Bloom 辉光效果
泛光:光源周围产生发光效果
注意:只有在相机的渲染设置中启用了 HDR(高动态范围)并且灯光或自发光材质足够亮时,才能实现泛光。
| Property | Description |
|---|---|
| Threshold | Set the gamma space brightness value at which URP applies Bloom. URP does not apply Bloom to any pixels in the Scene that have a brightness lower than this value. The minimum value is 0, where nothing is filtered. The default value is 0.9. There is no maximum value. 设置 URP 应用 Bloom 的 Gamma 空间亮度值,URP 只会将“光晕”应用于场景中亮度高于此值的任何像素。最小值为 0,其中不筛选任何内容。默认值为 0.9。没有最大值。 |
| Intensity | Set the strength of the Bloom filter, in a range from 0 to 1. The default is 0, which means that the Bloom effect is disabled. 在 0 到 1 的范围内设置 Bloom 滤镜的强度。默认值为 0,表示禁用了辉光效果。 |
| Scatter | Set the radius of the bloom effect in a range from 0 to 1. Higher values give a larger radius. The default value is 0.7. 将光晕效果的半径设置在 0 到 1 的范围内。值越大,半径越大。默认值为 0.7。 |
| Tint | Use the color picker to select a color for the Bloom effect to tint to. 使用颜色选取器选择要着色的“绽放”效果的颜色。 |
| Clamp | Set the maximum intensity that Unity uses to calculate Bloom. If pixels in your Scene are more intense than this, URP renders them at their current intensity, but uses this intensity value for the purposes of Bloom calculations. The default value is 65472. 设置 Unity 用于计算 Bloom 的最大强度。如果场景中的像素强度高于此强度,则 URP 会以当前强度渲染它们,但会使用此强度值进行绽放计算。默认值为 65472。 |
| High Quality Filtering | Enable this to use high quality sampling. This reduces flickering and improves the overall smoothness, but is more resource-intensive and can affect performance. 启用此功能以使用高质量采样。这样可以减少闪烁并改善整体平滑度,但会占用更多资源,并可能影响性能。 |
| Skip Iterations | The last iterations in the processing sequence might have little contribution to the appearance of the rendered frame. In this setting you define the number of final iterations to skip. Increasing this value reduces processing load and increases performance, especially on mobile devices. The default value is 1. 处理序列中的最后一次迭代可能对渲染帧的外观影响不大。在此设置中,您可以定义要跳过的最终迭代次数。增加此值可减少处理负载并提高性能,尤其是在移动设备上。默认值为 1。 |
Lens Dirt 镜头污垢
| Property | Description |
|---|---|
| Texture | Assign a Texture to apply the effect of dirt (such as smudges or dust) to the lens. 指定纹理以将污垢(如污迹或灰尘)的效果应用于镜头。 |
| Intensity | Set the strength of the Lens Dirt effect. 设置镜头污垢效果的强度。 |
Chromatic Aberration 色差
模拟相机的色彩偏移效果,在屏幕正中心的地方,不会出现偏移,越靠近屏幕四周,就越会发生偏移
可以用来模拟喝醉酒之后的镜头

| Property | Description |
|---|---|
| Intensity | Set the strength of the Chromatic Aberration effect. Values range between 0 and 1. The higher the value, the more intense the effect is. The default value is 0, which disables the effect. 设置色差效果的强度。值范围介于 0 和 1 之间。该值越高,效果越强烈。默认值为 0,将禁用效果。 |
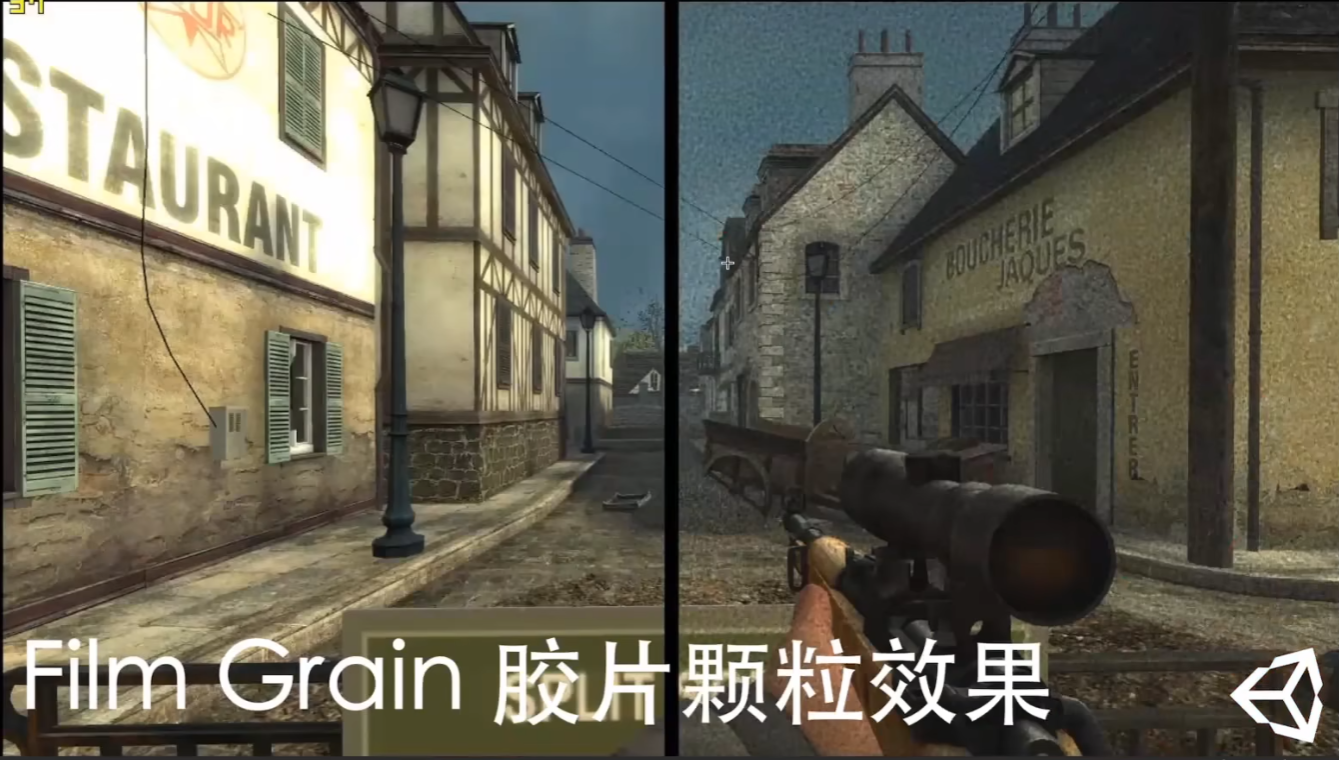
Film Grain 胶片颗粒
胶片颗粒效应模拟了摄影胶片的随机光学纹理,通常是由物理胶片上存在小颗粒引起的。
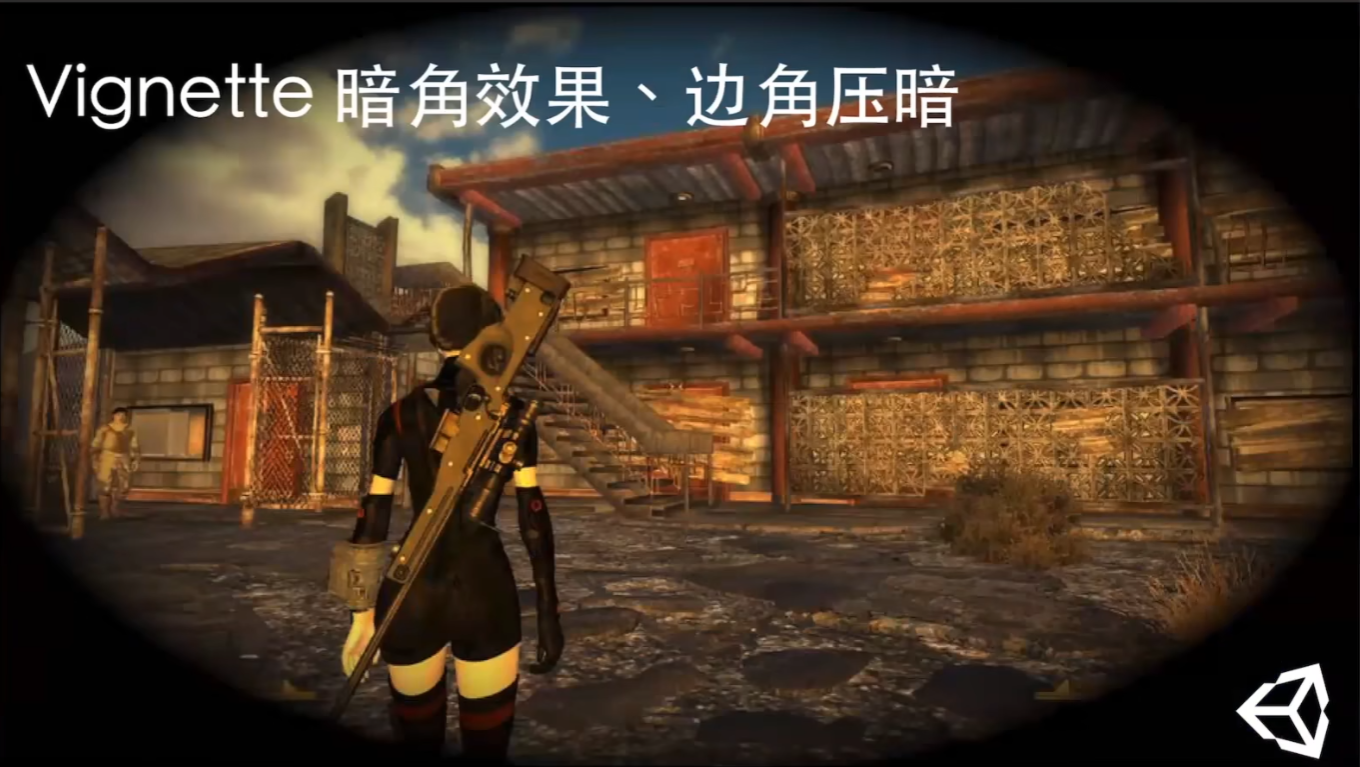
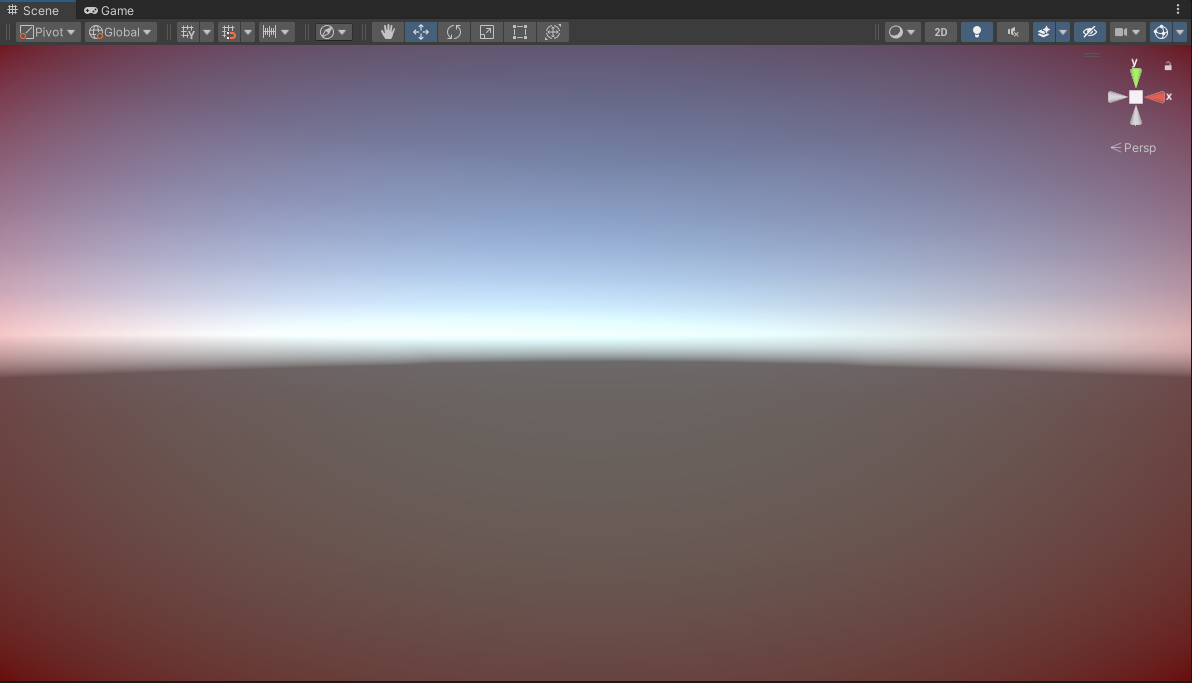
Vignette 边角压暗
在屏幕四周增加变暗的效果,模拟狙击镜,潜行,恐怖气氛,或者残血提示
| Property | Description |
|---|---|
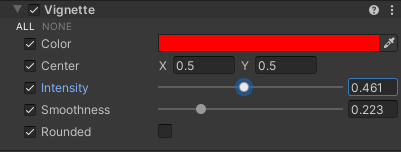
| Color | Use the color picker to set the color of the vignette. 使用颜色选择器设置晕影的颜色。 |
| Center | Set the vignette center point. For reference, the screen center is [0.5, 0.5]. 设置晕影中心点。作为参考,屏幕中心为 [0.5, 0.5]。 |
| Intensity | Set the strength of the vignette effect. 设置晕影效果的强度。 |
| Smoothness | Use the slider to set the smoothness of the vignette borders. Values range between 0.01 and 1. The higher the value, the smoother the vignette border. The default value is 0.2. 使用滑块设置晕影边框的平滑度。取值范围介于 0.01 和 1 之间。该值越高,晕影边框越平滑。默认值为 0.2。 |
| Rounded | When enabled, the vignette is perfectly round. When disabled, the vignette matches the shape on the current aspect ratio. 启用后,晕影是完全圆形的。禁用后,晕影将与当前纵横比上的形状匹配。 |
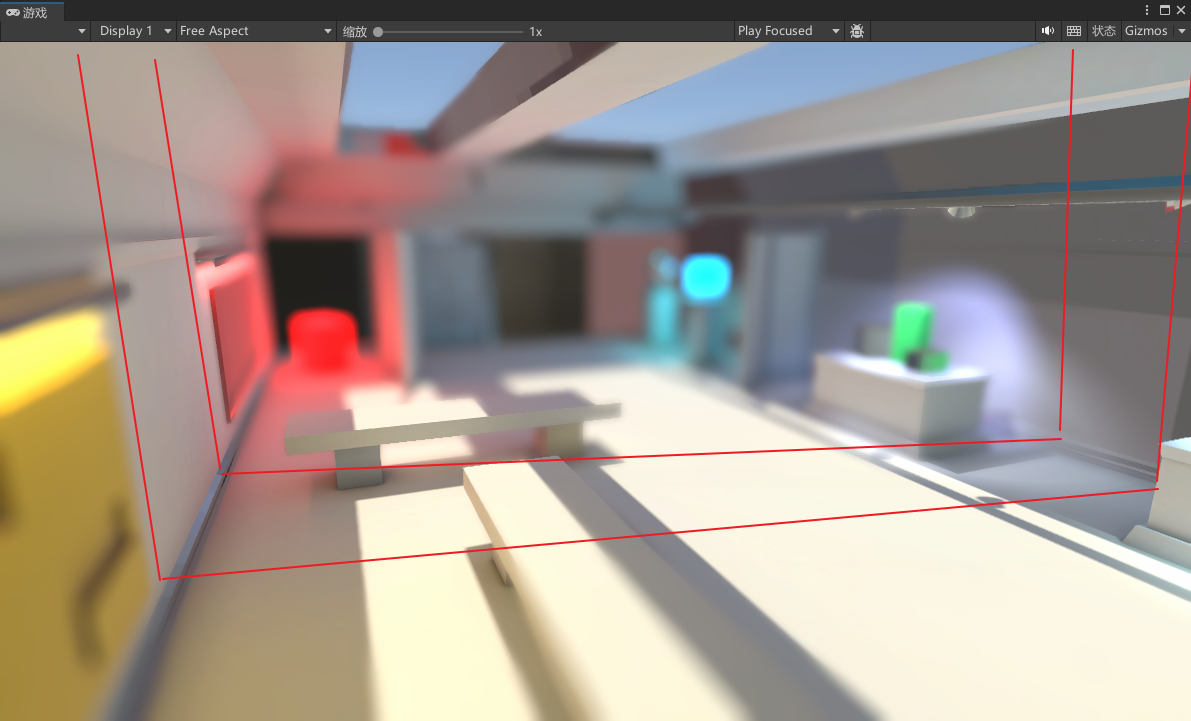
Depth of Field 景深
景深的原理及shader实现:用Unity实现景深效果 - 知乎 (zhihu.com)
三种渲染管线的自带景深实现:Unity 景深Depth Of Field-CSDN博客
景深效果就是用来虚化背景,在现实生活中,相机只能清晰地聚焦在特定距离的物体上。离相机更近或更远的物体都会失焦。unity支持两种模式
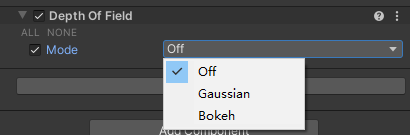
- Gaussian: this mode approximates camera-like effects, but doesn’t imitate them completely. It has a limited blur radius and only does far-field blurring. This mode is the fastest, and is the best mode for lower-end platforms. 高斯:此模式近似于类似相机的效果,但不能完全模仿它们。它的模糊半径有限,只做远场模糊。此模式是最快的,也是低端平台的最佳模式。
- Bokeh: a slower but higher quality mode that closely imitates the effects of a real-life camera. It can do both near & far-field blurring, and generates bokeh on areas with high luminosity intensity, also known as hot spots. 散景:一种速度较慢但质量较高的模式,与现实生活中的相机效果非常相似。它可以进行近场和远场模糊,并在高光度强度的区域(也称为热点)上产生散景。
Gaussian Depth of Field
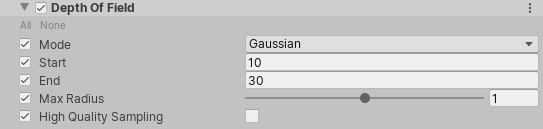
近场和远场:在Unity的景深效果中,通常有一个近场(near field)和远场(far field)的概念。近场中的物体是清晰的,而远场中的物体则逐渐变得模糊。
模糊半径:模糊半径是指物体因景深效果而变得模糊的程度。在Unity中,这个半径通常是通过算法计算得出的,它基于物体到相机的距离、相机的焦距、光圈大小等因素。模糊半径的大小决定了模糊效果的强弱。半径越大,模糊效果越强烈;半径越小,模糊效果越轻微。
| Property | Description | 解释 |
|---|---|---|
| Start | Set the distance from the Camera at which the far field starts blurring. 设置远场开始模糊时,离相机的距离。 |
这个参数定义了从相机开始,远场(far field)中的哪些物体开始变得模糊。 |
| End | Set the distance from the Camera at which the far field blur reaches its maximum blur radius. 设置远场模糊达到其最大模糊半径时,离相机的距离。 |
这个参数定义了远场中的物体在距离相机多远时,其模糊效果达到最大。也就是说,超过这个距离的物体,其模糊效果将不会变得更加强烈,而是保持在一个固定的模糊半径。 如果End值小于Start,那么无事发生 如果End值大于Start,那么模糊会分为两部分 在Start到End之间,模糊逐渐增加 超过End,模糊达到最大 |
| Max Radius | Set the maximum radius the far blur can reach. The default value is 1. 设置远处模糊可以达到的最大半径。默认值为 1。 Note: Values above 1 can cause visual under-sampling artifacts to appear in your Scene. If your blur effects are not smooth or appear to have static noise in them, try decreasing the value back to 1 or lower. 注: 大于 1 的值可能会导致场景中出现视觉采样不足伪影。如果您的模糊效果不平滑或看起来有静态噪点,请尝试将该值减小回 1 或更低。 |
从相机开始,远场中的物体在模糊时可以达到的最大模糊程度 |
| High Quality Sampling | Use higher quality sampling to reduce flickering and improve the overall blur smoothness. This can cause some performance cost. 使用更高质量的采样来减少闪烁并改善整体模糊平滑度。这可能会导致一些性能损失。 |
画个图就是这样的

所以,高斯模式虽然能够产生景深,性能花销也小,但是效果一般
Bokeh Depth of Field

散景模糊,会使相机所看的某个立方体区域之外的地方变得模糊,这个立方体如下
| Property | Description | 解释 |
|---|---|---|
| Focus Distance 焦距 | Set the distance from the Camera to the focus point. 设置从相机到焦距点的距离。 |
这个立方体离相机的距离 |
| Focal Length 焦距 | Set the distance, in millimeters, between the Camera sensor and the Camera lens. The larger the value is, the shallower the depth of field. 设置相机传感器和相机镜头之间的距离(以毫米为单位)。该值越大,景深越浅。 |
值越大,立方体越窄 |
| Aperture 光圈数 | Set the ratio of aperture (known as f-stop or f-number). The smaller the value is, the shallower the depth of field is. 设置光圈比(称为光圈值或f值)。该值越小,景深越浅。 |
值越小,立方体越窄 |
| Blade Count 叶片数 | Use the slider to set the number of diaphragm blades the Camera uses to form the aperture. The more blades you use, the rounder the bokeh appear. 使用滑块设置相机用于形成光圈的光圈叶片数量。您使用的叶片越多,散景就越圆。 |
|
| Blade Curvature 叶片曲率 | Use the slider to set the curvature of diaphragm blades the Camera uses to form the aperture. 使用滑块设置相机用于形成光圈的光圈叶片的曲率。 The smaller the value is, the more visible aperture blades are. A value of 1 makes the bokeh perfectly circular. 该值越小,孔径叶片的可见度越高。值为 1 可使散景完全呈圆形。 |
|
| Blade Rotation 叶片旋转 | Use the slider to set the rotation of diaphragm blades in degrees. 使用滑块设置隔膜叶片的旋转(以度为单位)。 |
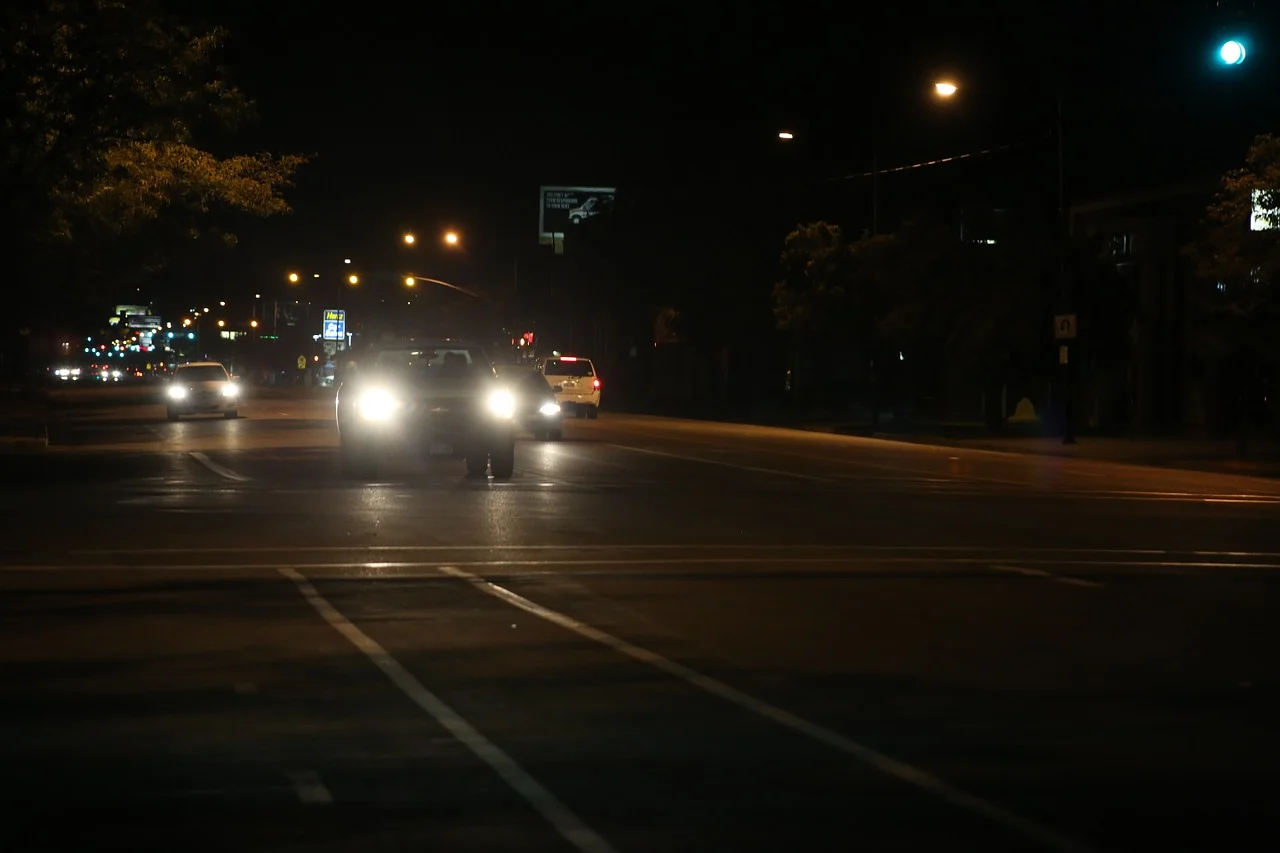
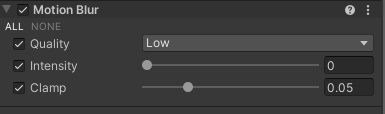
Motion Blur 运动模糊
“运动模糊”效果模拟当真实世界的摄像机拍摄移动速度快于摄像机曝光时间的物体时图像中发生的模糊。这通常是由于快速移动的物体或曝光时间长造成的。
| Property | Description |
|---|---|
| Quality | Set the quality of the effect. Lower presets give better performance, but at a lower visual quality. 设置效果的质量。较低的预设可提供更好的性能,但视觉质量较低。 |
| Intensity | Set the strength of the motion blur filter to a value from 0 to 1. Higher values give a stronger blur effect, but can cause lower performance, depending on the Clamp parameter. 将运动模糊滤镜的强度设置为介于 0 到 1 之间的值。较高的值可提供更强的模糊效果,但可能会导致性能降低,具体取决于 Clamp 参数。 |
| Clamp | Set the maximum length that the velocity resulting from Camera rotation can have. This limits the blur at high velocity, to avoid excessive performance costs. The value is measured as a fraction of the screen’s full resolution. The value range is 0 to 0.2. The default value is 0.05. 设置相机旋转产生的速度可以具有的最大长度。这限制了高速下的模糊,以避免过高的性能成本。该值是以屏幕全分辨率的一小部分来衡量的。取值范围为 0 到 0.2。默认值为 0.05。 |
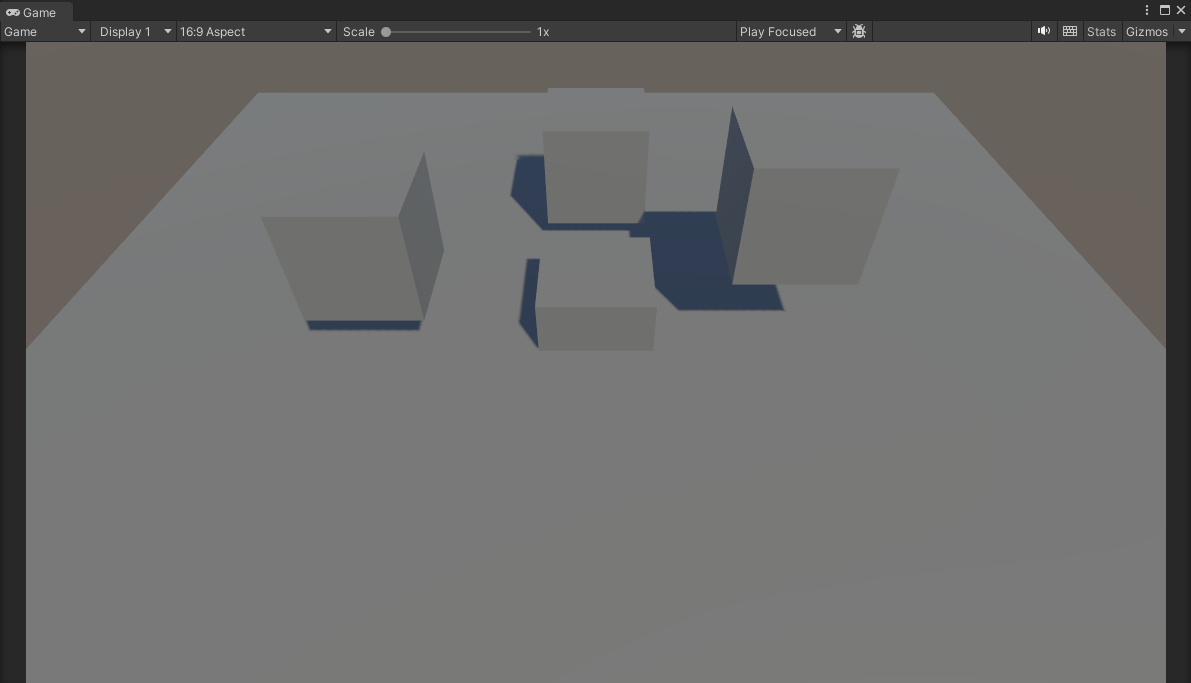
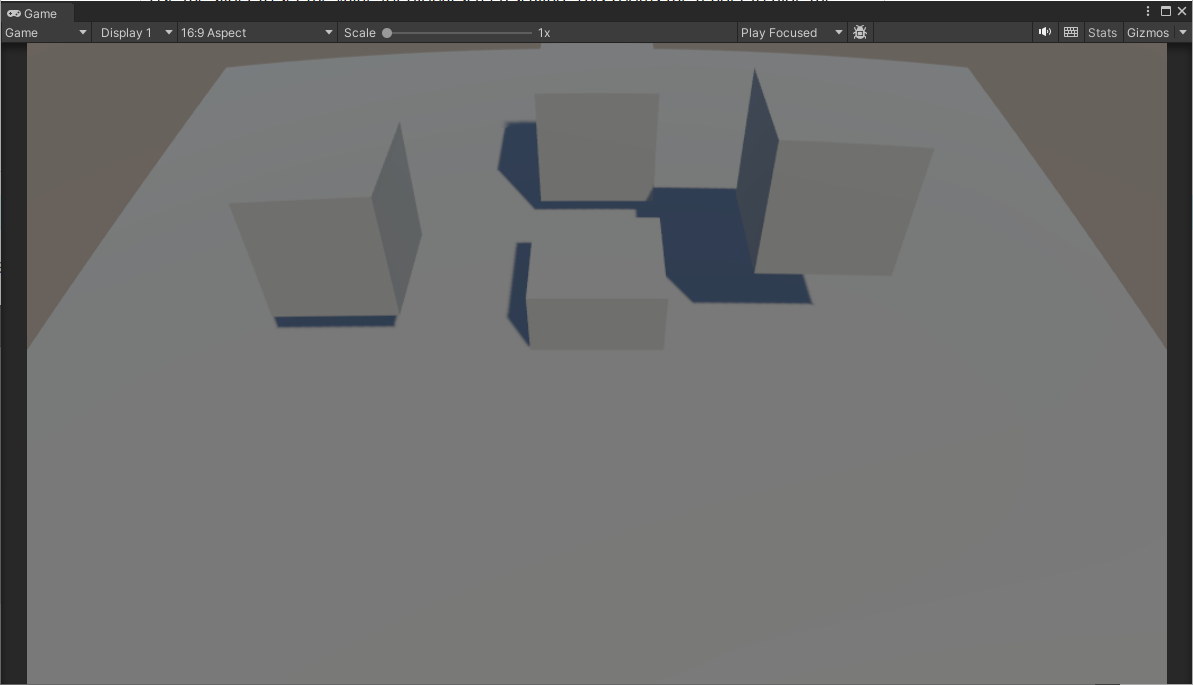
Lens Distortion 镜头畸变
镜头失真效果会扭曲最终渲染的图片,以模拟真实世界相机镜头的形状,比如鱼眼,离镜头过近时的变形

| Property | Description |
|---|---|
| Intensity | Use the slider to set the overall strength of the distortion effect. 使用滑块设置失真效果的整体强度。 |
| X Multiplier | Use the slider to set the distortion intensity on the x-axis. This value acts as a multiplier so you can set this value to 0 to disable distortion on this axis, 使用滑块在 x 轴上设置失真强度。此值充当乘数,因此您可以将此值设置为 0 以禁用此轴上的失真, |
| Y Multiplier | Use the slider to set the distortion intensity on the y-axis. This value acts as a multiplier so you can set this value to 0 to disable distortion on this axis, 使用滑块在 y 轴上设置失真强度。此值充当乘数,因此您可以将此值设置为 0 以禁用此轴上的失真, |
| Center | Set the center point of the distortion effect on the screen. 在屏幕上设置失真效果的中心点。 |
| Scale | Use the slider to set the value for global screen scaling. This zooms the render to hide the borders of the screen. When you use a high distortion, pixels on the borders of the screen can break because they rely on information from pixels outside the screen boundaries that don’t exist. This property is useful for hiding these broken pixels around the screen border. 使用滑块设置全局屏幕缩放的值。这将缩放渲染以隐藏屏幕的边框。当您使用高失真时,屏幕边框上的像素可能会断裂,因为它们依赖于来自屏幕边界之外不存在的像素的信息。此属性可用于隐藏屏幕边框周围的这些损坏的像素。 |
——以下组件需要结合使用——
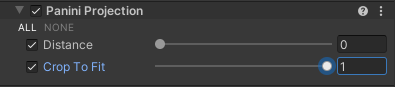
Panini Projection 帕尼尼投影
帕尼尼投影也是一种镜头畸变,但可以保证四周的位置不变
| Property | Description |
|---|---|
| Distance | Use the slider to set the strength of the distortion. 使用滑块设置失真强度。 |
| Crop to Fit 裁剪以适应 | Use the slider to crop the distortion to fit the screen. A value of 1 crops the distortion to the edge of the screen, but results in a loss of precision in the center if you set Distance to a high value. 使用滑块裁剪失真以适合屏幕。值为 1 会将失真裁剪到屏幕边缘,但如果将“距离”设置为较高值,则会导致中心精度损失。 |
Tonemapping 色调映射
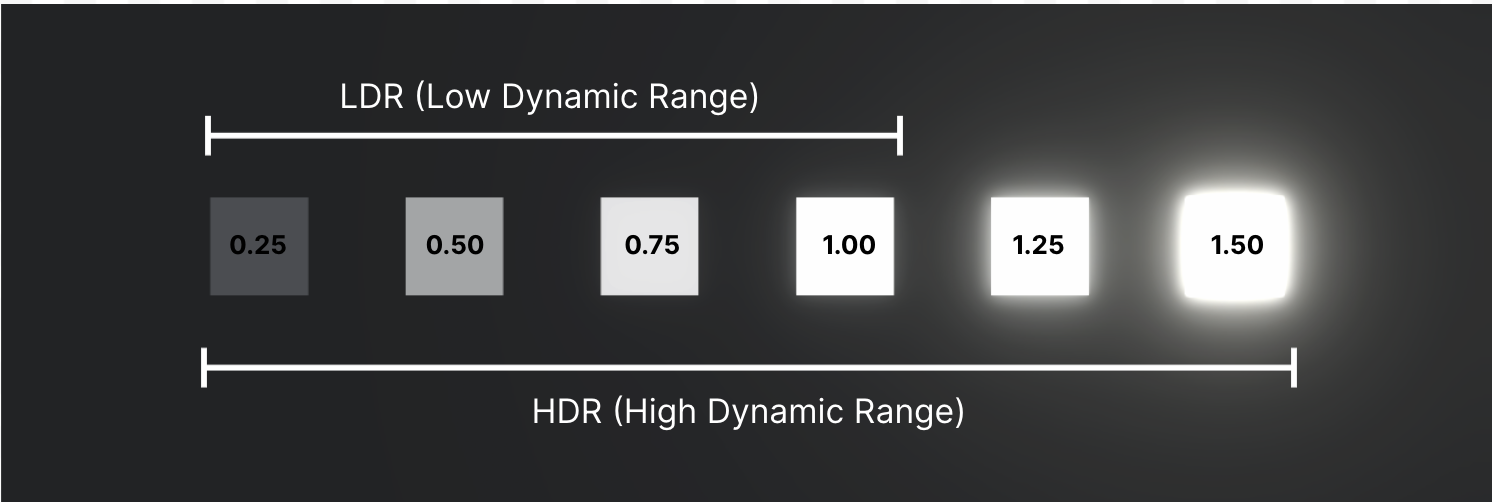
HDR(High-Dynamic Range) ,简单来说就是一种提高影像亮度和对比度的处理技术,它可以将每个暗部的细节变亮,暗的地方更暗,丰富更多细节色彩,让电影,图片都能呈现出极佳的效果。让你在观影时更接近真实环境中的视觉感受。
传统SDR(标准对比度)最高亮度只有100nit,画面中高于100nit的部分将被失真(丢失),最低调试为0.1nit,画面中低于0.1nit的部分将被丢失。HDR技术的出现,让最高亮度达到数千nit,,最低亮度达到了0.0005nit,极大的拓展了画面中亮度高于100nit以及低于0.1nit部分的细节,同时让整幅画面看上去更加通透明快、细节丰富。
如果启用了 HDR(高动态范围),则可以在场景中实现更大范围的亮度值(或亮度)。例如,使用正常的 LDR(低动态范围),您也许能够显示最大亮度值为 1.0 的灯光。但是使用 HDR,您可以显示 1.5 的亮度值(如果需要,也可以显示更高的亮度值!)
HDR所做的,实际上就是暗的更暗,亮的更亮。
然而,HDR仍然会有一些问题。尽管我们可以将场景中物体的亮度调高到与太阳一样亮,但普通屏幕无法显示该亮度,当您有限的屏幕硬件试图表现真正明亮的物体时,它会达到其物理能力的极限,并且只会将整个区域变成白色,从而冲刷掉其路径上的所有细节。色调映射,可以解决这个问题。
色调映射会获取那些非常极端的亮度值,并将它们重新“映射”到较低的值,从而恢复那些被冲淡的区域的细节,否则这些区域会丢失在白色斑点中。
色调映射会让屏幕更暗,色调映射有两种,Neutral和ACES
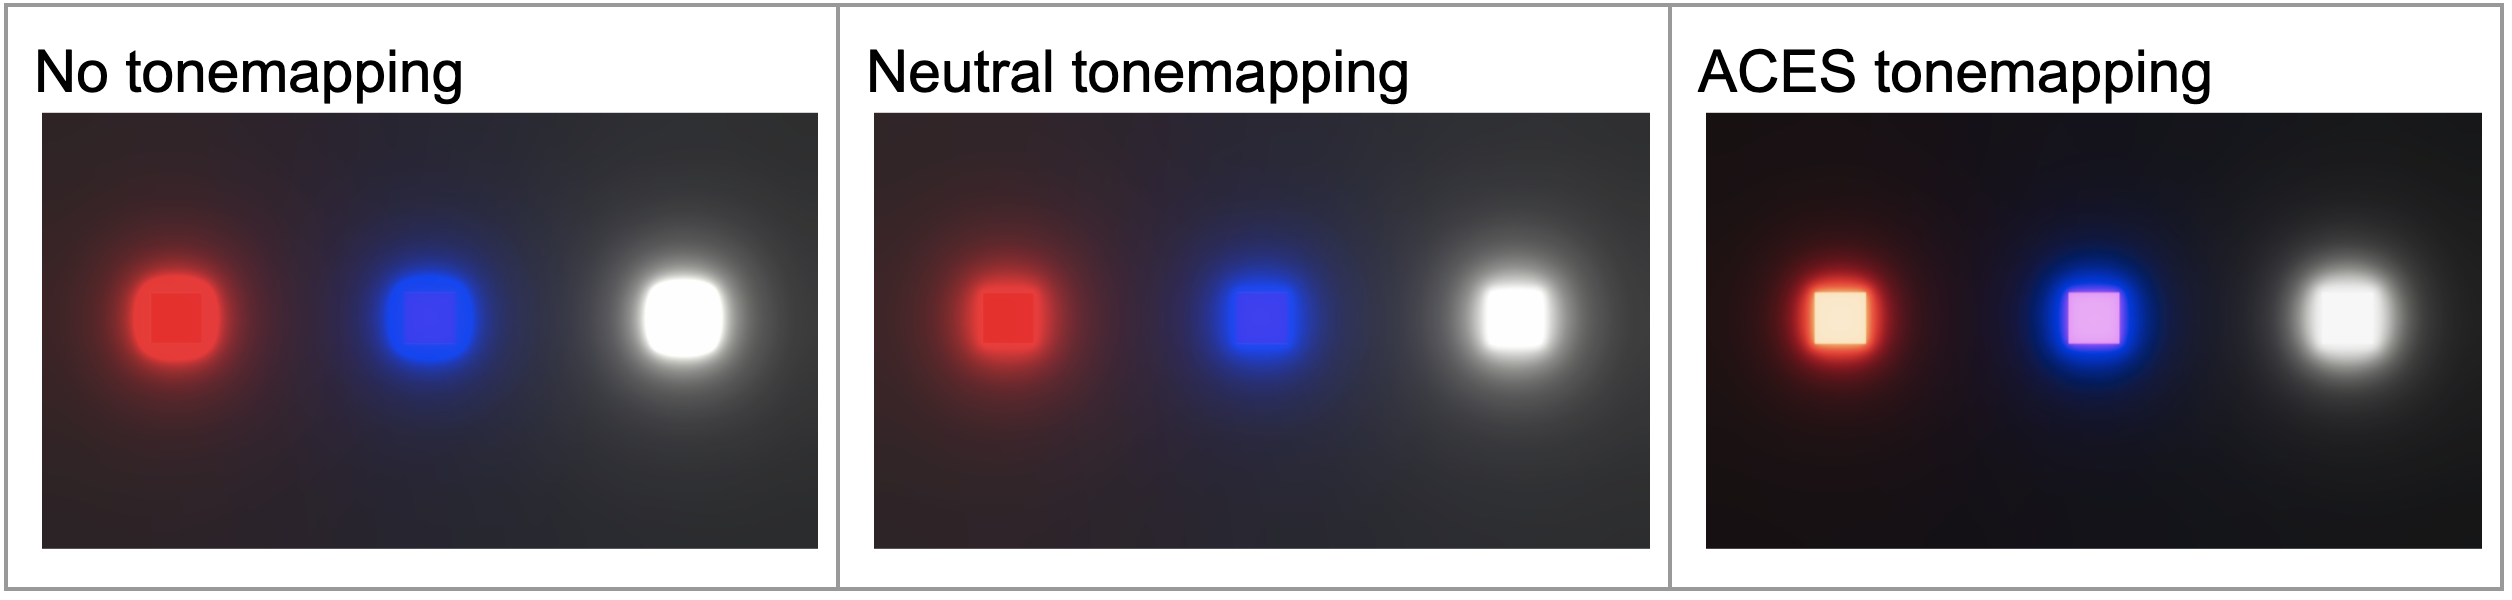
ACES更偏影片的画质感,会更暗
White Balance 白平衡
使用白平衡在最终渲染中创建整体更冷或更暖的感觉
主要是偏黄到偏蓝之间的转换
Color Adjustments 色彩调整
可以调整最终渲染图像的整体色调、亮度和对比度
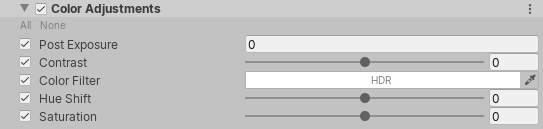
| Property | Description |
|---|---|
| Post Exposure 曝光后 | Adjusts the overall exposure of the Scene in EV (not EV~100~). URP applies this after the HDR effect and before tonemapping, which means that it does not affect previous effects in the chain. 调整EV(而非EV)中场景的整体曝光 100 。URP 在 HDR 效果之后和色调映射之前应用此功能,这意味着它不会影响链中的先前效果。 |
| Contrast | Use the slider to expand or shrink the overall range of tonal values. Larger positive values expand the tonal range and lower negative values shrink the tonal range. 使用滑块来扩展或缩小色调值的整体范围。较大的正值会扩展色调范围,而较低的负值会缩小色调范围。 |
| Color Filter | Use the color picker to select which color the Color Adjustment effect should use to multiply the render and tint the result. 使用颜色选取器选择颜色调整效果应使用哪种颜色来增加渲染和着色结果。 |
| Hue Shift | Use the slider to shift the hue of all colors. 使用滑块偏移所有颜色的色调。 |
| Saturation | Use the slider to push the intensity of all colors. 使用滑块推动所有颜色的强度。 |
Split Tone 色调分离
此效果根据亮度值为图像的不同区域着色,以帮助您获得更独特的外观。您可以使用它为场景中的阴影和高光添加不同的色调
在颜色选取器中为每个属性调整颜色时,只应调整“色相”和“饱和度”。值也会改变整体图像亮度。

| Property | Description |
|---|---|
| Shadows | Use the color picker to select the color that URP uses for tinting shadows. 使用颜色选取器选择 URP 用于着色阴影的颜色。 |
| Highlights | Use the color picker to select the color that URP uses for tinting highlights. 使用颜色选取器选择 URP 用于着色高光的颜色。 |
| Balance | Use the slider to set the balance between Shadows and Highlights. Lower values result in more pronounced shadow toning is compared to highlight toning. Higher values result in the opposite effect, with more pronounced highlight toning compared to shadow toning. 使用滑块设置阴影和高光之间的平衡。与高光色调相比,较低的值会导致更明显的阴影色调。较高的值会导致相反的效果,与阴影色调相比,高光色调更明显。 |
Channel Mixer 通道混合器
通道混音器可修改每个输入颜色通道对输出通道整体混音的影响。例如,如果增加绿色通道对红色通道整体混合的影响,则最终图像的所有绿色区域(包括中性/单色)都会变为更红的色调。
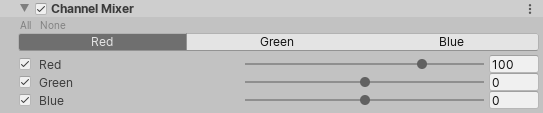
| Property | Description |
|---|---|
| Red | Use the slider to set the influence of the red channel on the selected output channel. 使用滑块设置红色通道对所选输出通道的影响。 |
| Green | Use the slider to set the influence of the green channel on the selected output channel. 使用滑块设置绿色通道对所选输出通道的影响。 |
| Blue | Use the slider to set the influence of the blue channel on the selected output channel. 使用滑块设置蓝色通道对所选输出通道的影响。 |
Color Curves 颜色曲线
颜色曲线是调整色相、饱和度或亮度特定范围的高级方法。您可以调整八个可用图形中的曲线,以实现特定色调替换或降低某些亮度等效果。
| Curve | Description |
|---|---|
| Master | This curve affects the luminance across the whole image. The x-axis of the graph represents input luminance and the y-axis represents output luminance. You can use this to further adjust the appearance of basic attributes such as contrast and brightness across all color channels at the same time. 这条曲线会影响整个图像的亮度。图形的 x 轴表示输入亮度,y 轴表示输出亮度。您可以使用它同时进一步调整所有颜色通道的对比度和亮度等基本属性的外观。 |
| Red | This curve affects the red channel intensity across the whole image. The x-axis of the graph represents input intensity and the y-axis represents output intensity for the red channel. 此曲线会影响整个图像的红色通道强度。图形的 x 轴表示红色通道的输入强度,y 轴表示输出强度。 |
| Green | This curve affects the green channel intensity across the whole image. The x-axis of the graph represents input intensity and the y-axis represents output intensity for the green channel. 此曲线会影响整个图像的绿色通道强度。图的 x 轴表示输入强度,y 轴表示绿色通道的输出强度。 |
| Blue | This curve affects the blue channel intensity across the whole image. The x-axis of the graph represents input intensity and the y-axis represents output intensity for the blue channel. 此曲线会影响整个图像的蓝色通道强度。图的 x 轴表示蓝色通道的输入强度,y 轴表示蓝色通道的输出强度。 |
| Hue Vs Hue | This curve shifts the input hue (x-axis) according to the output hue (y-axis). You can use this to fine tune hues of specific ranges or perform color replacement. 此曲线根据输出色相(y 轴)移动输入色相(x 轴)。您可以使用它来微调特定范围的色调或执行颜色替换。 |
| Hue Vs Sat | This curve adjusts saturation (y-axis) according to the input hue (x-axis). You can use this to tone down particularly bright areas or create artistic effects such as monochromatic except a single dominant color. 此曲线根据输入色调(x 轴)调整饱和度(y 轴)。您可以使用它来淡化特别明亮的区域或创建艺术效果,例如单色(单一主色除外)。 |
| Sat Vs Sat | This curve adjusts saturation (y-axis) according to the input saturation (x-axis). You can use this to fine tune saturation adjustments made with Color Adjustments. 此曲线根据输入饱和度(x 轴)调整饱和度(y 轴)。您可以使用它来微调通过“颜色调整”进行的饱和度调整。 |
| Lum Vs Sat | This curve adjusts saturation (y-axis) according to the input luminance (x-axis). You can use this to desaturate areas of darkness to provide an interesting visual contrast. 此曲线根据输入亮度(x 轴)调整饱和度(y 轴)。您可以使用它来降低黑暗区域的饱和度,以提供有趣的视觉对比。 |
Shadows,Midtones, Highlights 阴影、中间色调、高光
分别控制渲染的阴影、中间色调和高光。与“提升”、“伽玛”、“增益”不同,您可以使用此效果来精确定义阴影、中间色调和高光的色调范围。
Lift,Gamma,Gain
Lift Gamma Gain 轨迹球遵循 ASC CDL 标准。当您调整轨迹球上点的位置时,它会将图像的色调向给定色调范围内的该颜色移动。使用不同的轨迹球来影响图像中的不同范围。调整轨迹球下方的滑块以偏移该范围的颜色亮度。
具体这些东西是干嘛的就偏美术了
其他相机效果
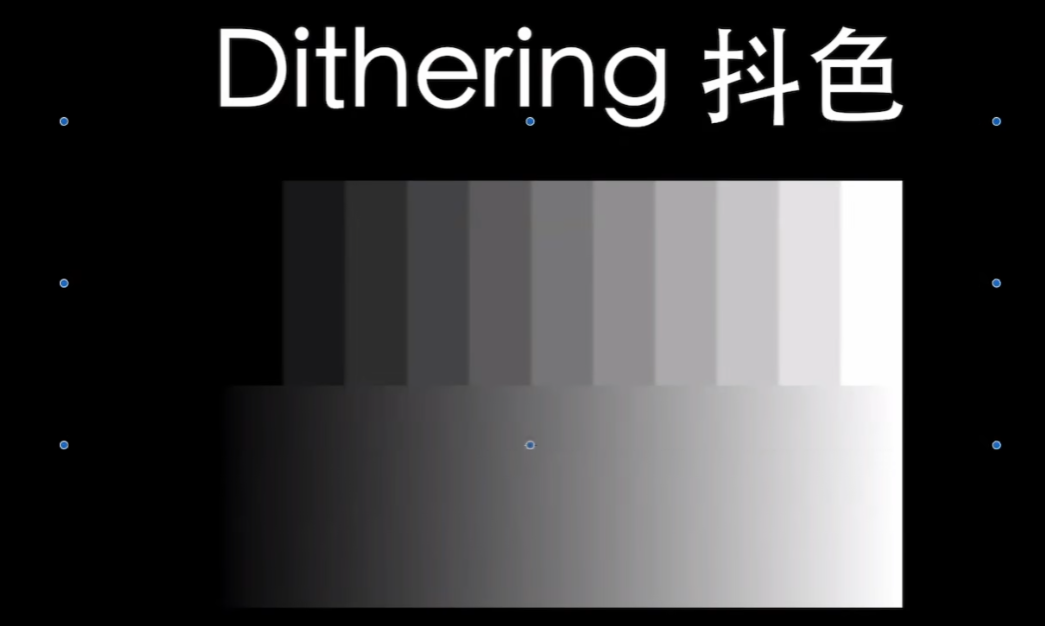
Dithering 抖色
通过插值,来消除色阶,直接在Camera组件勾选即可
抗锯齿
FXAA
SMAA
TAA
参考
后处理入门 - Unity Learn —- Get started with post-processing - Unity Learn